b2ap3_thumbnail_hold_up_in_gmail_400.jpg

How to Block and Unsubscribe from Users with Gmail’s New Features

b2ap3_thumbnail_hold_up_in_gmail_400.jpgWe all know how annoying spam and unwanted emails can be when you’re trying to navigate your inbox. While a quality spam filter can go a long way toward eliminating these irritating time-wasters, Gmail now has a feature that lets you dodge some of this pain. With the ability to block selected users and unsubscribe from email campaigns, you can reclaim plenty of time that you might have been wasting weeding out your inbox.

Before we dig into the details, though, it should be mentioned that, while Gmail’s new feature is indeed a good first step towards eliminating spam in your inbox, it’s by no means a guarantee that you’ll see a significantly less amount of time-wasting messages. A comprehensive spam-blocking solution is often necessary to keep malicious emails and other time-wasting junk out of your inbox. Just because you block or unsubscribe from a particular email address doesn’t mean that emails won’t start pouring in from another source. If you have concerns over your current levels of spam and junk mail, feel free to contact NuTech Services at 810.230.9455.

Still, Gmail is taking strides to make it easier for the average consumer to take advantage of the benefits of email, without the negative side-effects, like spam. If you happen to be receiving an alarming number of messages from a specific person that you don’t want to hear from, or if something just looks plain sketchy, you can block anything further from the sender. Any blocked messages will immediately be sent straight to your spam folder. To block someone, all you have to do is open an email from the sender you want to block, click on the down-arrow next to the reply button, and select Block “user.”

Gmail’s unsubscribe feature works in a similar manner to the unsubscribe links that you might find in various advertisement emails, like ones you might get from Amazon or other big-box retailers. On the Android Gmail app (the most recent version – this feature isn’t on the desktop version of Gmail yet), open a message from the user you want to unsubscribe from. Click the three-dot More button next to Reply and select Unsubscribe.

While this doesn’t necessarily block spam completely, it’s a good step in the right direction. Your goal shouldn’t be to send all spam to the spam folder; in order to achieve maximum productivity and email security, you want to prevent spam altogether. For more tips on how to accomplish this feat, give NuTech Services a call at 810.230.9455. Also, be sure to subscribe to our blog, where we often post about the latest security developments, security how-tos, and much more. When it comes to securing your email from spam, and protecting your business from hackers, you need all of the help you can get.

b2ap3_thumbnail_keyboard_cleaning_400.jpg

Tip of the Week: How to Save Your Keyboard After Spilling Your Drink On It

b2ap3_thumbnail_keyboard_cleaning_400.jpgYou know that you shouldn’t keep a beverage near your computer, but how good are you at actually abiding by this best practice? Due to the busyness of our modern lives, it’s likely that most office workers eat more meals at their computer than away from it. Inevitably, this will lead to a drink spilt on your keyboard, which can put you in a rather sticky situation.

When your keyboard takes an unintended plunge, what can you do about it?

First off, don’t just sit there with your keyboard sopping wet and try typing into Google, “How to clean Mountain Dew off my keyboard.” The liquid will only seep further into your keyboard, making it extremely difficult to type. Actually, a sugary substance like Mountain Dew will cause your keys to stick, which means that your Google Search query would actually look something like this:

not good ib1

Don’t lollygag when faced with a liquid-on-your-keyboard crisis or you’ll just make the problem worse. Instead, take immediate action by following these five steps:

Power Off Your Computer and Disconnect the Keyboard
By far, your computer is way more important than your keyboard (and quite possibly your outfit that also took a Mountain Dew bath). Therefore, as soon as you can, be sure to either disconnect your keyboard. Most modern keyboards are USB, so they can be unplugged with the computer on, but other keyboards use round connectors. Unplugging the round connectors while the PC is on could cause damage, so if you aren’t sure just shut the PC down before disconnecting the keyboard. Act quickly, the liquid may seep into the keyboard’s circuits and cause some problems (and not the good kind like we saw from Coca-cola’s spilt-soda-on-computer scenario).

Flip the Keyboard Upside Down and Give it a Good Shaking
When you encounter a spill, your first instinct is to get up and grab a towel. Before you do that, flip your keyboard over and shake it. Basically, when dealing with a spill, you’ve got precious little time to locate a towel while the ill-fated beverage seeps deeper and deeper into your circuits.

Wipe Down Your Keyboard
After gravity has done its job and drained as much liquid as possible, now is the time to use a dry cloth to wipe down your mess. Do what you can to get in between the keys, but don’t do anything drastic like apply too much force or pop off the keys, yet. For now, the goal is clean up, not detailing.

Let it Dry Overnight
Next, find a dry place to let your keyboard sit upside down overnight. When you come back to it the next day, look for any additional moisture that may be left and give it a wiping.

Check for Stickiness
Before plugging in your now-dry keyboard, press on every key to check for stickiness. This will most likely be the case if you split a sugary substance, like Mountain Dew. To clean out the stickiness, you’ll have to remove the keys to really clean underneath. Computer Hope offers some solid advice on how to do this:

Removing a standard keyboard key is simple. Start by pressing down on the key in front of the key you want to remove and insert a flat object such as a car key… or a small flathead screwdriver below the key. Once below the key twist it or push down until the key pops off. If you want to remove more than one key, repeat this process until all keys are removed.

Once you’ve got your keys removed, using a tool like a Q-tip will really help with those small and hard-to-reach places, with both your keyboard and your ear canal.

Lastly, with your keyboard fully cleaned and dry, plug it in and give it a spin. If you were fast-acting enough to catch the mess, then you might have been able to save it. Although, if the spill was too great, then your keyboard might be toast and you’ll have to replace it. You’ll know for sure when you sit down with your cleaned keyboard and try it out.

We hope that you’ve found this week’s tip helpful. For more great technology tips, subscribe to NuTech Services’s blog and check back every week.

b2ap3_thumbnail_incognito_mode_400.jpg

3 Easy Ways to Go Incognito In Google Chrome

b2ap3_thumbnail_incognito_mode_400.jpgThe Internet can be a dangerous place. Sometimes you want to keep your identity a secret on the web. Now, your reasons for doing so aren’t any of our business, but you should know that there are several ways to access this secretive function in Google Chrome. Here are three ways you can take advantage of Google Chrome’s Incognito mode to browse the web in an anonymous fashion.

Why Incognito Mode?
Incognito mode has several advantages over your typical Google Chrome browsing session. For one, you can allow someone to use their Google account on your device without signing out of your current session. On the other hand, sometimes you might not want your browsing history to stick around. While this is often associated with viewing questionable content online, it’s also convenient when planning for a surprise party or purchasing a gift so that the recipient isn’t aware of the situation.

Keep in mind that, while you’re browsing the web in a more anonymous fashion than you would be normally, your activity can still be seen by your Internet service provider (ISP).

The Classic Way to Incognito Mode
Activating Incognito mode is super easy, but it requires a couple of steps. First, click on the hamburger menu in the corner of Chrome, titled Customize and control Google Chrome.

incognito ib 1

Next, click on New incognito window. Your new window should pop right up.

incognito ib 2

Open a New Incognito Window Through Right-Clicking
Let’s say you find an article on the web that you really want to view, but you’re not sure who could be watching your activity. In order to avoid showing them what you’re viewing, you can right-click a link and select Open in incognito window. Another situation where this might be useful is when you’re shopping for something particular that you don’t want another user to see in the search history. Simply right-click the item you’re considering to privately browse it.

A Simple Two-Click Solution
If neither of these solutions are simple enough, the easiest way to access Incognito mode is by taking advantage of the top of your Chrome window, and selecting the account button to the left of the minimize button. This gives you the option to either switch users or go incognito, providing more than one solution to the issue in one handy location.

Or, better yet: here’s a keyboard shortcut that opens up incognito mode. Just use Ctrl+Shift+N to open a new incognito window.

For more tips and tricks about how to be more productive in the workplace, call NuTech Services at 810.230.9455.

b2ap3_thumbnail_windows_10_privacy_400.jpg

Tip of the Week: Adjust Windows 10’s Privacy Settings to Keep Your Information Secure

b2ap3_thumbnail_windows_10_privacy_400.jpgIt would be prudent to begin by saying that Windows 10 is far and away the most refined version of Windows ever created. In a lot of ways, it’s like using a souped-up version of Windows 7, with a sprinkling of Windows 8/8.1 metro on top. Beneath the surface, however, is a vast information-collecting infrastructure that has many users left worried about their privacy. There are even conspiracy theories suggesting that Windows 10 is a vessel used by the NSA in order to collect all the information on every user.

Anyone that is familiar with the fallout of Edward Snowden’s whistleblowing campaign knows that government agencies don’t need Microsoft’s software engineers to syphon as much information as they want, but that doesn’t mean there aren’t some potential privacy issues with the new OS. In fact, it could be said that the default settings of Windows 10 violate user privacy. Here are some of the ways they do so.

Advertising ID
The first privacy issue users are having with Windows 10 is that each user is automatically assigned an ID based on the email address they use to sign in. By capturing information using this ID, Windows 10 will tailor the advertisements that users see when surfing the web or uses certain applications.

Cortana
In order to get the most comprehensive user experience available, the Cortana application collects data; and not just essential data, but seemingly everything. In attempting to make the best personal assistant application on the market, Microsoft has made it a point to capture every piece of information they can. This presents privacy issues for some, but they’re likely no more intrusive than Cortana’s competitors: Apple’s Siri and Google’s Google Now.

Windows Modern Apps
Windows Modern or Universal Apps are also at the center of the perceived controversy. Each of these apps collects your location, which is no different than their Windows 8.1 versions. The situation that is presenting problems for users’ privacy is the advanced reporting these apps do to the central Microsoft servers. For example, when using the very useful OneNote app, the content of the notes are synced with the Microsoft servers.

Many users will not mind receiving better services in return for computing information, but many users are up in arms on Windows 10 policy of deliberately sharing all captured information with their “partners”; a series of third-party vendors that can use this information to improve their sales and marketing tactics. For the purposes of user privacy, however, there are actions that can be taken to limit the ability for Windows 10 to report user computing performance.

First, you need to access the privacy menu, which can be found in the start menu. Simply open the start menu, then click on Settings and select Privacy from the pop-up.

privacy ib 1
One thing that can be said for Windows 10 is that there are a lot of options. Each one of the privacy settings above represents the ability for Windows 10 to work for the user, albeit by the user sacrificing their privacy. The first suggestion we have, if you are one of the many users that feel as if Microsoft doesn’t need to know every movement you make on your home PC, is to disable the targeted advertising ID.

privacy ib 2
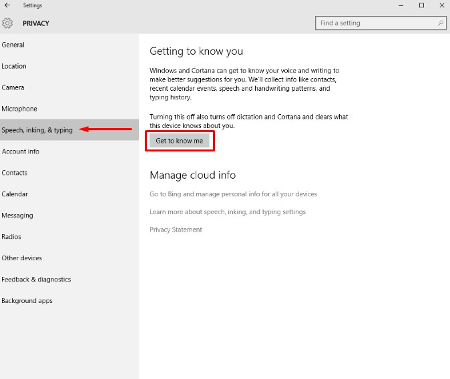
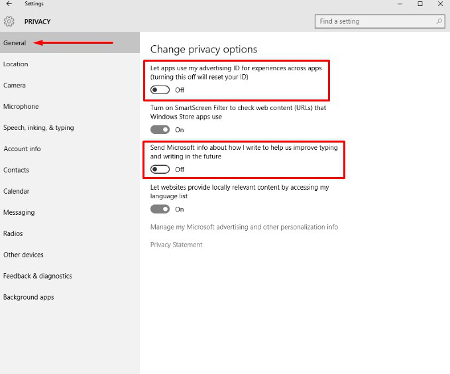
From this screen users can also turn off SmartScreen Filter if you are worried about the Windows Store syphoning links to Store items. Many users will choose to leave this option on, but will want to turn the other two off. “Send Microsoft info about how I write..” is basically a keylogger, and its practical application is to provide information for Cortana and language settings that give regional information to Microsoft.

privacy ib 3
From there, clicking on Location will take you to a list of applications that use your location. Services like weather, traffic, news, and Cortana utilize your current location to provide you the best representation of relevant information for your situation. If you are using a desktop computer, there is little value one way or the other, but on mobile, turning off applications that don’t need your location won’t hurt the perception of privacy.

It is best to leave your Camera and Microphone options toggled on if you want to use Skype or another video communications application.

privacy ib 4
The next tab is the Speech, inking & typing tab. These options are used primarily with Cortana. If you choose not to utilize Cortana, you can consider telling Windows 10 to stop getting to know you. The problem with this is many Windows Store-based apps require your account info, making it impossible for you to turn off this option.

Privacy is a major consideration for most users on the Internet, especially in lieu of many companies’ strategy of selling off user information. These are only a couple of options that you can consider to keep your personal information personal. At NuTech Services we understand why privacy and security are important for users. Our certified technicians can present you with options and best practices that will allow you to remain private and secure while online. Call us today at 810.230.9455 for more information.

b2ap3_thumbnail_person_network_400.jpg

Tip of the Week: Sharing Files Between 2 PCs is as Easy as Dragging and Dropping

b2ap3_thumbnail_person_network_400.jpgWhat’s the best way to share files between your different personal devices and computers? It turns out that you can share files over your home’s network, and you don’t have to be an IT technician to do it.

To be sure, there are many different ways to share files between your different devices. You can send an email from one device to another. You can upload the file to a cloud data storage service. You can even use an external data storage device like a USB thumb drive. While all of these methods will do the trick, some are more inconvenient than others (like using a thumb drive), while others (like the first two examples) require an Internet connection and reliance on a third party.

Instead, you might be surprised to learn that you can just as easily (if not more easily) move files over your home network to your different devices by dragging and dropping what you need to a shared folder. This functions similarly to how your computer network at the office is set up with its server units and multiple workstations. However, you don’t need a home server unit to share files across your different devices at home. Instead, if you’ve got two computers connected via your home’s Internet router, then you’re all set to easily share files between the two machines.

Share Files Using My Network Places
To do this, open My Network Places, locate a file associated with the computer that you want to share files with (designated by the PC’s assigned name), and then drag and drop your content into the shared file. To access the shared content with the computer that you just shared it with, locate My Network Places on your other computer and open the file that corresponds with the actions you just took.

Or Create a Windows Homegroup
If for some reason you’re unable to share the files you need between your two computers using My Network Places, then you can set up a Windows Homegroup. To do this, type “homegroup” in the Windows search box and then hit Enter. From here, Windows will let you know if there are any homegroups on your network. If it can’t find one, click Create a homegroup.

Next, select what kind of content and devices that you want to share in this homegroup and then select Next.

homegroup ib 1

Windows will now generate a password that you will want to use for other computers to access the newly created homegroup. Be sure to record and share this in a secure manner if you’re adding multiple users to the homegroup.

Lastly, using the other computer on your home network, search for “homegroup” in the Windows search bar. This should bring up a dialogue box letting you know that a new homegroup has been added to your network. It will display the name of the computer you’ve originally used to create the homegroup. Now, just click Next > Enter the password > click Next again > and you’ll have both of your computers set up on the homegroup for easy file sharing.

If you need professional assistance with any of your computer networking needs, give NuTech Services a call at 810.230.9455.

b2ap3_thumbnail_shortcuts_for_windows_10_400.jpg

Tip of the Week: 10 Handy Windows 10 Keyboard Shortcuts

b2ap3_thumbnail_shortcuts_for_windows_10_400.jpgWith the launch of Windows 10, many users are upgrading and loving every second of it. As always, a new operating system comes with a learning curve, including getting to know the new features and keyboard shortcuts. To get the most out of Windows 10, you can try these ten great hotkey combinations to get through your workday with blazing speed.

[WinKey + S] Activates Cortana
[WinKey + C] Activates Cortana with Speech
Microsoft’s Cortana feature, which was once exclusive to Windows Phone users, is now built into Windows 10 by default. She acts as a personal voice assistant, much like Apple’s Siri. You can use these shortcuts to make more effective use of Cortana.

[WinKey + Ctrl + D] Creates a New Virtual Desktop
[WinKey + Ctrl + F4] Close Virtual Desktop
[WinKey + Ctrl + Left or Right] Switch Between Virtual Desktops
One of the neat new features Windows 10 offers is virtual desktops, which will most likely be used by enterprises to enhance productivity. You can easily use the above keystrokes to navigate through your current virtual desktops, plus open and close them on your local desktop.

[WinKey + Shift + Left or Right] Move Apps from One Monitor to Another
Workers generally use two monitors to get the most done, but if you’re working with several different applications, it can be a bother to continually resize the windows and move them about. To make this process much easier, use the above keystroke while you have a window selected.

[WinKey + K] Activates Connect Feature to Stream to Wireless Displays and Audio Devices
This keystroke is pretty self explanatory, and it will be used often by those who regularly access Connect.

[WinKey + R] Run a Command
Regardless of how many new features there are in Windows 10, the basics still apply. You’ll want to access the Run Command function. This keystroke makes it much easier to do so.

[WinKey + I] Opens Windows 10 Settings
As one of the most customizable operating systems Microsoft has created, Windows 10 offers plenty of great ways you can put the “personal” back in your PC. Use this keystroke to make navigating to your settings easier.

[WinKey + G] Activates the New Xbox Game Bar to Let You Record Games or Take Screenshots
All you gamers out there are going to love this keystroke.

For more ways you can get the most out of Windows 10, keep an eye out for more productivity and technology tips from NuTech Services.

b2ap3_thumbnail_comment_spam_400.jpg

Tip of the Week: How to Take Back Your Website From Comment Spammers

b2ap3_thumbnail_comment_spam_400.jpg“Wow. That was a great article! I make $500 a day working from home and you can too! Click the link below to learn how!” This is an example of comment spam. You may have seen it before. You may have even fallen for it. How does one deal with such an annoyance?

Comment spam is much more than an annoyance. If your company’s website or social media account is filled with comment spam, it gives potential customers the impression that you don’t care about upkeeping your website and it will discourage them from leaving valuable comments of their own.

There are several tools and settings that can help you decrease the amount of comment spam on your website, but none of these tools are perfect, and all of them require a commitment from a real person to oversee the comments and delete the spam. Here are four tools that will help in your battle against spam.

Disable Your Comments
This is a weapon that you have in your arsenal, but like the “nuclear option,” you don’t want to use it unless you absolutely have to. The reason you don’t want to disable your comments is because authentic comments are valuable–even the negative ones.

Comments give the impression that many people view your website as a resource that’s worth visiting. Search engines pick up on comment-generated web traffic and give your website a higher search ranking. Even the negative comments are good because they give you the opportunity to directly respond and set the record straight professionally and publicly. This will communicate to others that your business cares about a customer’s experience. The only reason why a business should disable comments is if they never do any maintenance on their website–ever.

Approve Comments Before Posting
This is a nice setting that makes sure a moderator is first laying their eyes on the comment before it’s posted. This is a sure-fire way to filter out spam–unless the spammer happens to be clever enough to fool you or the person tasked with moderating your website. If you are fooled by a comment spammer by letting one slip by, then take solace in the wisdom of former President George W. Bush, “Fool me once, shame on you. Fool me… you can’t get fooled again.”

The downside about depending on a moderator to filter comments is that it can turn into a cumbersome task. If the content on your website is popular, it can generate a lot of comments that need to be approved. Also, a user knowing that their comment will have to be moderated before it’s posted may discourage them from commenting. Some people simply prefer to see their comments instantly display, like with instant messaging.

Use Recaptcha
Recaptcha is a helpful tool that makes sure actual people are posting. When a user leaves a comment, they will be shown a picture of some numbers (like from the side of a house). They will then be asked to enter the numbers into a form. This will filter out spam bots that automatically spam websites, as well as a percentage of human spammers that aren’t in the mood to fill out a few extra forms in order to post their spam. However, this tool isn’t 100 percent effective because a dedicated human comment spammer will fill in the required Recaptcha numbers.

Block Spammers’ IP Addresses
If you happen to come across a spammer, your website platform should allow you to block the user’s IP address from accessing your website. By looking at some spammer statistics from Imperva, you will see how blocking a comment spammer’s IP address will go a long way toward taking care of the problem:

80 percent of the comment spam originates from less than one-third of the spammers, and a mere 17 percent of comment spammers actually account for a majority of the comment spam traffic. Imperva also found that nearly 60 percent of comment spammers are active for long periods of time.

Vigilance is the Key
You can think of fighting spam like fighting a battle. The key to winning any battle is vigilance. You have to stay on top of your company’s website maintenances; letting a few spam comments slip through due to negligence can cost your business dearly by potentially turning away customers.

Spam has many forms and all of them are harmful. Spam shows up in the inboxes of your employees and drags down productivity, as well as causes wicked computer viruses. Staying on top of your Internet marketing means staying on top of spam. What are some of the most annoying spam comments that you’ve come across? Let us know in the comments… actually, don’t.

computer_that_talks_400.jpg

Tip of the Week: Take Advantage of Notepad’s Text-to-Audio Feature

computer_that_talks_400.jpgSome people talk to their computers, but not like they would speak to another human being. We coax it into doing it what we want, or we curse it out when it doesn’t. A day may come when artificial intelligence has progressed so far that we won’t be able to distinguish a computerized conversation from a normal one; but it is not this day. Until that glorious day comes, we’ll have to settle for these two methods to interact verbally with your PC.

My Notepad Sure Has a Big Mouth
We bet you didn’t know that the Windows Operating System has a tool installed on its Notepad that allows it to convert text to audio. However, this feature isn’t available without a little tinkering on your part. It requires a bit of programming, but infusing life into your Notepad is as easy as copying some text and slapping it on the page.

It’s Alive!
First, you want to open Notepad. Copy and paste this text into Notepad:

Dim msg, sapi
msg=InputBox(“Enter your text for Conversation | Tool by Irshad (http://pctricksonline.blogspot.com)”,”PC Hacks Text-To-Audio Converter”)
Set sapi=CreateObject(“sapi.spvoice”)
sapi.Speak msg

Go to File > Save As, and make sure that the file type reads text_audio.vbs. Afterward, close the note and open the text_audio.vbs file. A magic little box will appear on your screen. Type your text into the box and pat yourself on the back; you’ve just breathed life into an inanimate object (sort of). Fun things to type into this include, but are not limited to, “Help! I’ve been turned into a computer,” “Look at me. I’m a computer programmer,” and “Kneel before me, humans!”

That’s Not What I Said
If you don’t want to try your hand at programming Notepad to breathe life into your PC, you could always try using Google Voice Search. This is a standard Google Chrome feature, and is very easy to use. You simply go to Google’s homepage and click on the microphone icon to the right of the Google search bar. Then, you speak into your microphone and Google will search for it. The more the app is used, the more accurate it becomes. You might want to consider turning Safe Search on if you are afraid of what you might accidentally search for. You never know what you might find on the Internet.

“Smart” Phones
For those who want a simpler experience, there are always the apps offered for smartphones. Apple offers Siri for iOS, and Android has Google Now. It’s better than the magic 8-ball, we suppose, and you shouldn’t get too bored talking to them. Just remember, nothing is better than actual human interaction.

These technologies are just a taste of what’s to come over the next few years. Technology advancement is growing at an alarming rate, so keep your eyes peeled for other great interactive programs. What are your favorite interactive apps, and why? Share it with us in the comments!

b2ap3_thumbnail_tips_to_enhance_productivity_400.jpg

Tip of the Week: Try the 52-17 Rule to Get the Most Productivity Out of Your Workday

b2ap3_thumbnail_tips_to_enhance_productivity_400.jpgThere are countless ways to boost your productivity in the office… at least, that’s what the Internet says. How do you separate the productivity champs from the chumps? It’s simple, really; just look for the tried and true methods that have been backed by thorough research. One such study, performed by Julia Gifford of Draugiem Group, claims that workers can be more productive by not trying to do as much office work as possible.

This is hardly the first productivity strategy proposed by professionals. What makes this different from others? Well, it’s backed up with results. Using the tracking application DeskTime, the researchers at Draugiem Group examined how their best, most productive employees spent their time in the office. Surprisingly, it boiled down to how much time wasn’t being spent doing work.

52 Minutes of Work, 17 Minutes of Rest
While it might seem incredibly inefficient, the results of this study turned out to be a cycle of 52 minutes of hard work, followed by 17 minutes of rest. This is similar to the Pomodoro technique, another relatively well-known process which includes 25-minute work intervals with five-minute breaks, followed by one 15-minute break after the fourth increment. Overall, the 52-17 rule seems to be geared more for those who are confident they can stay focused on a single task for almost a solid hour.

The Importance of Rest
Rest is an absolutely critical part of any function performed by humans; therefore, its importance cannot be overemphasized. In fact, many researchers studying the science behind workplaces find that rest is absolutely imperative to the success of all participants.

Entrepreneur Chris Winfield claims that he cut his work week in half because he took consistent breaks throughout the workday. As you can imagine, finding the right balance between work and rest can be a tricky subject. Meetings and other time-sensitive appointments are difficult to fit into an individual’s schedule. For Winfield, he was able to cut his 40-hour work week down to 16.7 hours (not counting the time he spent in meetings). This is a considerable difference, especially because he was still getting everything done that he wanted to.

The End Result: Increased Flexibility
As you can imagine, scrunching your work week to less than half of the original size opens up several opportunities. The only way this is possible is with proper prioritization of important tasks. By ensuring that high-priority tasks are tackled in the most effective way possible, you’ll be able to approach the rest of your work in a clear, stress-free manner. Winfield claims that his approach changed the way he looked at the work week:

The final piece to my puzzle was moving from a five-day workweek, where I had to stop by 5 p.m., to a seven-day workweek, where I could work when it suited me. This took me from 40 to 45 hours available to get my 40 Pomodoros in, to having 168 hours each week. Since I only need 16.7 hours net, that means I only work 10% of my time. What a difference.

Granted, Winfield didn’t count the 20-to-25 hours of meetings and phone calls toward his total time, yet, he still managed to save his sanity by taking small breaks.

If you aren’t quite sold on either the Pomodoro technique or other work-break increment strategies, there are several other alternatives to look into. For one, you can look into using the latest and greatest technology solutions to improve the overall efficiency of your time spent working. Give us a call at 810.230.9455 to learn more about what productivity solutions can help your business.

b2ap3_thumbnail_chrome_extentions_400.jpg

Tip of the Week: The 4 Most Useful Extensions for Google Chrome

b2ap3_thumbnail_chrome_extentions_400.jpgIf you’re one of the many people who prefer Google Chrome to other browsers, you know all about extensions and how they can improve your browsing experience. These are mostly add-ons that are designed to augment your browsing experience or adding new features. While some aren’t so useful, there are others that are invaluable under the right circumstances. To help you get the most out of Chrome, here are four useful browser extensions that you should take advantage of.

Text Mode
You don’t need us to tell you that the Internet is a distracting place. Your attention span is at the mercy of YouTube videos, cute cat pictures, and just about everything else humanly imaginable. This can be quite irritating if you’re working on a deadline and absolutely need to complete a big project on time. In order to help you take back your productivity unsullied by the Internet, Chrome’s Text Mode extension eliminates all images so that you can concentrate on the task at hand. Thanks to there being no images loading, you’ll notice that the browser’s speed is slightly increased, as well.

AdBlock
Online ads are annoying. It’s as simple as that. You don’t want to accidentally click an ad and have even more tabs open than normal. More importantly, you just want to browse the web in peace without pop-up videos or distracting ad text in your sidebar. AdBlock completely blocks these ads from your web pages, allowing you to get back to business without a new ad catching your eye.

Lightshot
All Windows PCs come with the innate ability to take screenshots using the PrtScn key. The free tool Lightshot allows you to take focused, clear screenshots of select areas of your screen. For instance, you’ve received a strange error message or noticed a spelling error, and you want to report this to the appropriate personnel. Lightshot also comes with the ability to draw on the image, insert text, and more. You can then proceed to either upload it directly to the Internet, or save it locally on your PC. This helps you give your IT support team a visual representation of what your problem is, allowing for a swift resolution.

Google Cast
Google’s Chromecast is an essential part of any techie’s entertainment repertoire, but in order to use it effectively, you need the Google Cast extension on your PC. Chromecast is a device that you can plug into your television’s HDMI port to send content to the big screen. A great use of this would be in your office’s conference room for a meeting, or simply in your living room for movie streaming. It’s compatible with all sorts of entertainment mediums, like Netflix, YouTube, Google Docs, and more.

Do you have a favorite Google Chrome extension? If so, let us know in the comments.

b2ap3_thumbnail_android_security_400.jpg

Tip of the Week: How to Take Back Your Android Device from Bloatware

b2ap3_thumbnail_android_security_400.jpgSmartphones are filled with all sorts of nifty apps. In fact, some of the most useful applications come pre installed on the device. However, not all apps are worth your time. These unwanted applications are called “bloatware,” and can impede the device’s ability to perform to your specifications.

Bloatware is not only annoying, but it can also be threatening to your device’s wellbeing. For instance, Lenovo’s pre-installed Superfish software caused quite the security scare several months back. Furthermore, it can take up space on your device and affect the amount of data you can store on it. In order to get the most out of your Android smartphone, you want to remove as many junk apps as you can. Of course, you should always approach this kind of project with caution. You don’t want to accidentally get rid of a core function of your device and render it inert.

There are several ways to remove or hide bloatware from your device. TechRepublic suggests five apps to do so. Some require that your device is rooted (i.e. you have Superuser control over your phone’s core files and OS), while some simply hide the bloatware from you.

TechRepublic’s Top Anti-Bloatware Apps

  • NoBloat Free: This app allows you to view bloatware on your device, and completely remove it. All you have to do is locate it under the System apps listing, tap it, and then select what you want to do with it from the listed options.
  • System App Remover: As explained by TechRepublic, System App Remover “is a free bloatware removal tool (with ads) that makes removing system apps and bloatware go much faster. Simply open the app, grant root access, check off all the apps you want to remove, and tap the uninstall button.”
  • Root App Deleter: Here’s yet another app that can delete your bloatware from your phone. However, unlike the others, you can choose to either hide it or delete it completely. Hiding it doesn’t clear up any space, so you can go that route if you don’t want to risk deleting something important.
  • Disable Bloatware: If you don’t want to remove bloatware completely, you can choose to hide it with Disable Bloatware. As a non-rooted application, you can take advantage of it even if your phone isn’t rooted. This hides your bloatware so it doesn’t distract you, but it doesn’t free up any space on your device.
  • System Apps: This is Android’s built-in application hiding function. With it, you don’t have to download an app to hide your bloatware. As previously mentioned, this doesn’t free up any space on your device, but it does prevent your bloatware from being a nuisance.

If you want to optimize your mobile devices for productivity and efficiency, but don’t want to risk your device’s integrity, you can give NuTech Services a call at 810.230.9455. We’ll help you clean up your devices so that they’re nothing but productivity machines.

b2ap3_thumbnail_android_clock_400.jpg

Tip of the Week: How to Prevent Lollipop’s Bug From Breaking Your Alarm Clock

b2ap3_thumbnail_android_clock_400.jpgIf you own an Android device, you’re no-doubt aware that Google issued an upgrade to Android’s OS not too long ago. This update, dubbed Android 5.0 Lollipop, presents several aesthetic upgrades to devices which were running a previous Android OS. However, there were also some functionality changes, a few of which were less than desired; like the unexpected changes to Android’s alarm clock.

Don’t Put This Tip “On Snooze”
Before the Lollipop upgrade, Android’s alarm clock application worked in silent mode. This was exceptionally useful, especially if you wanted to turn your phone’s sound off overnight to get a good night’s rest. However, in Lollipop, Silent mode is called Mute mode, where all sounds from calls, texts, and other notifications are silenced… including alarms.

alarm 1

You don’t need us to tell you that this new functionality change can affect your ability to get to work on time in the morning. Thankfully, there’s a pretty simple fix to this problem, even if it’s not the most obvious solution.

Since Lollipop doesn’t allow alarms to go off in Mute mode, there’s an extra hoop you have to jump through in order to get them to work properly. You can set your phone to only go off for what are called Priority Interruptions. Because alarms are always considered priority interruptions, you shouldn’t have to worry about the alarm being silenced.

To activate Priority Interruptions, turn up your volume to Sound or Vibrate. Next, select Only allow priority interruptions.

alarm 2

Doing this opens a menu beneath your selection. Then, click Settings.

alarm 3

This lets you view the Priority Interruptions settings. Don’t be fooled by the Silent choice here; Priority Interruptions only work in Sound or Vibrate mode. If you really want a Silent mode similar to the previous version of Android, you can uncheck messages, phone calls, and reminders in Sound mode. This lets it basically act the same as it used to, more or less.

alarm 4

If you’re successful in setting your Priority Interruptions, a star will appear next to your alarm clock symbol at the top of your screen. Afterwards, it’s best to make a test alarm to make sure that it goes off as planned. It’d be a shame to go through all of this trouble just to miss your alarm. Of course, if all else fails, you could always get a dedicated alarm clock from your local department store; or, get a pet. Whichever works for you.

Be sure to subscribe to NuTech Services’s tech blog for great tips every week.

b2ap3_thumbnail_google_chrome_400.jpg

Tip of the Week: Load Cached Pages in Google Chrome for Offline Browsing

b2ap3_thumbnail_google_chrome_400.jpgYou might have experienced the frustration of reading an article online and having the Internet connection cut out on you. This is one of the most common problems while working with a shoddy WiFi connection. If this happens to you, you can view your browser’s cached pages in order to finish up what you were reading; so long as you’re not trying to view pages like Facebook, which update periodically throughout the day.

Here’s how you can view Google Chrome’s cached pages, even while offline.

What Exactly is Caching?
You might have heard the term in passing, but do you understand how the cache works? It’s basically a component that stores data when you visit a website. This allows that data to be loaded faster the next time you visit the page. The idea is to reduce bandwidth and processing power required to view the material.

How to Load Cached Chrome Pages
By taking advantage of the cache, you can read web content that you’ve previously accessed, even while offline. Chrome doesn’t automatically enable this feature, but there is an experimental add on that you can use from the mad scientists at Google. Type chrome://flags into the search bar.

flags

After reading Google’s disclaimer, locate the feature called Show Saved Copy Button. If you aren’t using the latest version of Chrome, try looking for Enable Offline Load Stale Button.

show button

Select Enable from the dropdown menu, which will prompt you to restart Chrome. When you next visit an offline web page, you’ll see a button that says Show Saved Copy. If you’ve previously visited the page, you’ll be able to load the cached copy of the website’s content.

offline

Keep in mind that due to the nature of website caching, you won’t be able to see any updates made to the page since you last visited it. This is the one true downfall of offline viewing. However, this is useful if you’re trying to finish reading an article where you don’t have Internet access.

Stay tuned next week for more productivity tips from NuTech Services.

b2ap3_thumbnail_excel_sheets_400.jpg

Tip of the Week: Freeze an Excel Row for Easier Spreadsheet Navigation

b2ap3_thumbnail_excel_sheets_400.jpgMany office workers feel like they live in Microsoft Excel, spending hours using spreadsheets to enter data and crunch numbers. By taking advantage of tools like Excel’s freeze feature, workers can make the most of their time by navigating a spreadsheet more efficiently.

Once a spreadsheet grows to be larger than the screen, it can become tricky to navigate. It can be maddening to try and cross-reference a certain row or column on one side of the spreadsheet with another that’s offscreen.

Excel’s freeze feature resolves this pain point by freezing a selected row or column into place, allowing you to scroll off screen while having your needed row or column locked into place. When you think about it, this Excel feature is kind of like a grown-up version of freeze tag.

To freeze a row or column in Excel, select the cell that’s in the first column and row that you don’t want to be frozen. Next, go to the View tab and click Freeze Panes. A drop down menu will appear. From here, click on the first option, Freeze Panes.

lock panes one

With your selected rows now frozen in place, you will be able to scroll up, down, and sideways in your spreadsheet without having your needed columns or rows move off screen. When you’re ready to unfreeze your rows and columns, simply select any row or column and then go to the View tab. Now go to Freeze Panes > Unfreeze Panes.

lock-panes-two

This is just one of the many Microsoft Office features that make navigating a project easier. Be sure to check back next week for more time-saving technology tips.

b2ap3_thumbnail_drive_for_business_400.jpg

Tip of the Week: See What’s Taking Up All of Your Google Drive Storage

b2ap3_thumbnail_drive_for_business_400.jpgHeavy users of Google Drive may experience the issue of running low on storage space. The easiest way to resolve this problem is to give Google money and upgrade your account. Before taking this step, there are a few tricks you can do to free up Google Drive space by locating and getting rid of unneeded files.

One reason why it’s possible to miscalculate how much storage space is being used by your Google Drive account is due to the fact that the 15GB every Google user gets isn’t a full 15GB of storage space. Of this 15GB of Drive space, Google allots this space for its various services, like Gmail and Google+.

To find out exactly what’s taking up space in your Drive account, go to your Drive’s storage page. This will provide you with a handy-dandy pie chart that lays everything out for you.

drive_in_blog_1.jpg

This chart displays how much storage space is being used and what the space is being used for. From here, you can spot the unneeded files that are taking up space. For example, the email attachments in Gmail end up in your Drive account, as well as all of your photos from Google+. You might want to sift through your Drive and delete these files if you don’t need them.

On your Drive storage page, you will find below the graph a section displaying specific information about space usage. Be sure to reference this if you’re on the hunt to free up space.

drive_in_blog_2.jpg

As is the nature of computer data, you will notice that the bulk of your space is likely to be taken up by media-rich files, like photos, music, and videos. Users of Google Apps that take advantage of Docs, Sheets, Slides, etc., will notice that these files don’t take up nearly the amount of space as does the large media files.

Therefore, if you’re looking to purge your Drive account and free up the most space possible, it’s best practice to start deleting the largest files first. To figure this out, go to the lower left-hand side of the screen in Drive, right above the link that says “Buy more storage.” From here, you’ll see your current storage use. Hover over it and a box will appear with more specific numbers. Click Drive.

drive_in_blog_3.jpg

This sorts your files by Quota used. From here, you can most efficiently manage your files.

Keep in mind that if you delete email files all willy-nilly, you may end up deleting something important that you’ll regret. Therefore, it’s best practice to archive your emails with a secure email solution. NuTech Services can provide this for you.

Got an Android device? If your device is linked to your Google Drive, then it may be adding some rather large files to your storage, especially if you use your Drive account to back up your Android device’s photos and videos. One way that you take control of this is to adjust the size of pictures stored from your device to Drive. To do this, go to Settings > Auto Backup > Photo Size, then select Standard size. Keep in mind that there may be instances when you don’t want Google to change the size of your images, so keep this file path in mind.

By following these steps, you will free up space on your Google Drive account and not have to upgrade. To learn more data storage tips and best practices, call NuTech Services at 810.230.9455.

b2ap3_thumbnail_mouse_wheel_click_400.jpg

Tip of the Week: 3 New Tricks to Teach Your Old Computer Mouse

b2ap3_thumbnail_mouse_wheel_click_400.jpgThe computer mouse has been a staple in the modern office for many years. Despite its proven usefulness, it’s now threatened by the growing adaptation of touchscreen devices in the workplace. Are you considering trading in your trusty mouse? Before you do, consider these three mouse scroll wheel tricks that make your boring old mouse more useful.

Who said you can’t teach an old mouse new wheel tricks?

tip-scroll-wheel-fun

Click a Link With the Scroll Wheel Button to Open it In a New Tab
What’s that you say, a mouse scroll wheel button? If this is the first you’ve heard about the scroll wheel also being a third button on your mouse, then you’re getting your money’s worth with this blog article because we just opened up for you a whole new and click-tastic world.

To execute this first trick, all you have to do is move the cursor over a hyperlink and click the mouse scroll wheel button. This will automatically open the link in a new browser tab, which is easier than having to right-click the hyperlink and then go to “Open link in new tab.”

Close the Browser Tab By Clicking it With the Mouse Scroll Wheel Button
When you’re done with your browser’s tab, you can close it just as easily using the mouse scroll wheel button. All you have to do is move your cursor anywhere on the tab and then select the mouse scroll wheel button.

Granted, this isn’t a major upgrade from selecting the red X with the left mouse button, but it does give you a little bit more room to work with. Additionally, once you get in the habit of using the mouse scroll wheel button, you’ll find yourself closing tabs in this manner more often.

Ctrl+Scroll Up to Zoom In/Ctrl+Scroll Down to Zoom Out
For our third trick, try using the mouse scroll wheel in conjunction with the Ctrl key for easy zooming in and out of your web browser, as well as most other applications too. As you hold down the Ctrl key, your page will zoom in as you push the mouse forward, and zoom out as you push the wheel in the opposite direction.

Ultimately, this is the fastest and easiest way to zoom in and zoom out, especially in comparison to locating the view tab and manually selecting “zoom in” or “zoom out.”

Bonus Tip: One of the handiest uses for this zoom-in feature is when you’re browsing a web page with annoying ads on the side of the page. Simply perform this new scroll wheel trick and zoom in just enough to where you no longer see the ads. Problem solved. You’re welcome.

It turns out that your old computer mouse can do more than what you previously thought. Pretty cool, huh? Perhaps now you’ll think twice about trading in your mouse and workstation for a fancy new touchscreen device. Or, maybe not.

Can you teach an old mouse any more new tricks? If so, share them with us in the comments.

b2ap3_thumbnail_android_battery_400.jpg

Tip of the Week: 3 Tricks to Get the Most Power Out of Your Android Device

b2ap3_thumbnail_android_battery_400.jpgSmartphones are exceptionally useful tools capable of enhancing your productivity, even while out of the office, but this comes at a steep cost. If your phone’s battery isn’t optimized to handle the workload, the multitude of apps will quickly drain it and you’ll be left with a dead device.

Thankfully, there are a ton of ways you can conserve your battery’s charge. To avoid being tethered to an outlet at all times, CNet has several suggestions for cutting down the amount of energy your battery wastes throughout the day.

Disable GPS-Based Services
Your phone will have its GPS enabled when you first receive it. This helps it communicate your location to satellites and cell phone towers. Unfortunately, all of this communication with the GPS phone chip eats up your device’s battery. Since many of these GPS features aren’t necessarily required for your device to function properly, you can get by just fine by turning them off.

Do this by going to Location reporting and Location history. These settings use your phone’s GPS alongside other Google applications to enhance your user experience, but they aren’t really necessary. Disable them by going to Settings > Location > Google Location Reporting.

in blog android

Turn Off WiFi Scanning
You probably use WiFi the most when you’re in the office or at home, but while you’re out and about, your device continuously scans for a new connection. This scanning constantly drains the battery, and automatically connecting to random WiFi networks while on the go can be a security threat.

To do this, make sure your autoconnect feature is turned off, and turn off WiFi scanning by going to WiFi settings > Advanced. If the WiFi scanning box is unchecked, you’re all set.

in blog android2

Keep Track of Your Data Sync
Android smartphones constantly sync to your Google account. This keeps your device’s data backed up and up to date, but the process of syncing your data might have unintended consequences… like a drained battery. Turning off your sync might solve this problem, but it’s more efficient to choose what data you’d like to sync.

Android allows you to filter the data sync process to certain files, like pictures and videos. Do this by heading to Settings > Accounts. Select the account to access the sync settings. You can then uncheck any items you don’t want synced, or turn it off completely if you want.

While there are plenty of ways to conserve your device’s battery, these are only three of them. For more tips and tricks on how to make your Android device as useful and efficient as possible, give us a call at 810.230.9455.

b2ap3_thumbnail_mobile_data_is_expensive_400.jpg

Tip of the Week: 4 Ways to Cut Down On Your Mobile Data Usage

b2ap3_thumbnail_mobile_data_is_expensive_400.jpgAs the world pushes toward a more mobile era, so too does the workplace embrace Bring Your Own Device (BYOD) with open arms. As such, workers will need some type of network connection in order to access mission-critical corporate data. Therefore, if they can’t connect to a WiFi network, they’ll default to their cell provider’s mobile data plan.

Unfortunately, too much strain put on this asset can quickly drain, or even surpass, your maximum monthly data expenditure. Therefore, reducing your mobile data usage can be a great way to cut down on your expenses and potentially improve battery life. Here are four ways to get started.

5six in blog1
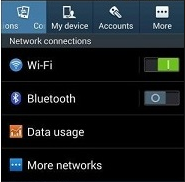
Monitor Your Current Data Usage
Before jumping too deep into how to limit your data usage, you first need to identify whether or not you’re using too much data. Chances are that if you aren’t having difficulty staying within your monthly data usage, you don’t need to make many changes to the way you use your device. However, if you find yourself constantly violating your maximum data limit, you’ll know you need to change the way you’re using your device.

Use WiFi Whenever Possible
A simple way to lower your use of mobile data is to stop using it whenever WiFi is available. Rather than using up your mobile data plan, you can simply take advantage of any wireless networks in range. While this is convenient, you don’t want to connect to any sketchy wireless hotspots in your vicinity. There’s always the chance that a network can be littered with threats. Therefore, the best way to keep your device secure is to only access connections with passwords and encryption, and to make sure your autoconnect feature is turned off.

Limit Your Media Consumption While Mobile

Though it makes life infinitely more enjoyable to stream music and video entertainment on the go, it can also be putting an enormous strain on your mobile data plan. Instead of streaming music through your 3G or 4G connection, try playing music stored locally on your device. This can prevent your device from consuming too much data too quickly.

Limit Which Apps Update in the Background
Unless you’ve explicitly configured your device otherwise, your applications will automatically update in the background while you’re going about your daily routine. Unfortunately, this can eat up a ton of data. To prevent this, you can set your device to update automatically when connected to WiFi, or to manually perform the updates yourself.

5six in blog2

If you find that even these four tips can’t stem the flow of your data problem, it might be time to cave in and get an upgrade. This should only be considered as a last resort, since it can help you avoid the overage fees associated with monthly data plans. All it takes is a little awareness of how much data you’re truly using in order to self-police yourself into staying within the confines of your monthly data plan.

b2ap3_thumbnail_no_stress_at_work_400.jpg

Tip of the Week: 5 Ways to Dramatically Reduce Workplace Stress

b2ap3_thumbnail_no_stress_at_work_400.jpg“Work smarter, not harder.” When you’re at your wit’s end, it’s annoying to be told this by a relaxed, know-it-all coworker. However, this productivity axiom holds up. Following this rule will allow you to get much more done, in a much shorter amount of time, and in a much more relaxed manner. Here are five productivity tips to help you “work smarter, not harder.”

Or, don’t follow these tips. Keep doing things the hard way and stress yourself out. The choice is yours.

Make and Stick to a Routine
The alternative to going by an organized schedule is to tackle the most seemingly-urgent task that hits your plate. This haphazard approach is a mega-stressful way to do things because you’ll always be working on the loudest, most drama-filled project.

By keeping to a strict routine, you’ll be able to schedule urgent tasks to more appropriate times. Additionally, you will want to include time to recharge and unwind from the stresses of life into your routine. If you’re not intentional about downtime being a part of your routine, then your day will quickly be overrun by things that stress you out. As a bonus, your routine can be adjusted and tweaked to allow for maximum productivity, which can’t be said for the haphazard approach.

Prioritize Your To-Do List
Having a to-do list in conjunction with a routine can do wonders to minimize stress levels. To get the most out of your to-list, try prioritizing your tasks so that your to-do list isn’t an overwhelming list of stuff that needs to be done. For example, if you assign each task with a priority level, like A, B, or C, then you’ll have a good idea of what to work on, which will minimize your stress level.

Delegate Lower-Priority Tasks
Once you have your to-do list determined and prioritized, you will then be able to appropriately delegate tasks on your list. From your list, you can easily determine what the tasks are that only you can do and which tasks your team can handle. This will minimize stress because you’ll know that you’re working on jobs that absolutely need your attention, while your staff is working on lower-priority tasks. By not delegating in this manner, you might end up giving jobs to your staff based on how “urgent” it seems, instead of based on how qualified they are for the job.

Deadlines Reduce Stress
If you don’t have a clear deadline for a project, then you might sink way more time into it than what you need to, which causes stress. Or, without a deadline, you might procrastinate on a project and never get around to it, which causes stress of a different variety. By not having a clear deadline, you will inevitably end up scrambling to get stuff done last minute, which will produce subpar results, and even headaches.

in blog frustration

With a hard deadline set, you will be able to schedule your work in manageable chunks so that you’re not last-minute panicking all of the time.

Keep Your Work and Personal Life Separate
One of the worst things you can do for your stress level is to bring your work with you to your home. Your home is supposed to be a place where you recharge and unwind from the day’s stressful activities so that you’re rested up to go back to work and take on the next day’s challenges. Granted, there are times when you have to work late hours or answer an urgent email from home, but this shouldn’t be the norm. If you’re intentional about guarding your home life from the stresses of your work life, then you’ll experience less stress and more productivity in your professional life.

Stressed out? By being intentional about how you manage your time, you will see your stress levels plummet, which will lead to a much more relaxed and productive lifestyle. What are some of your favorite productivity tips? Share them with us in the comments.

b2ap3_thumbnail_is_your_current_it_still_ok_400.jpg

Tip of the Week: 3 Options to Consider Before Trashing Your Old Technology

b2ap3_thumbnail_is_your_current_it_still_ok_400.jpgIt’s often the case that people excitedly upgrade to new technology without giving much thought about what to do with their old tech. In an upgrade situation like this, you’ve got a few options for dealing with your old technology that are good for the environment, socially responsible, and may even provide you with some cash.

Alternatively, you could just toss your old equipment in the garbage.

tip-recycling-unused-IT.jpg

As convenient as it is to throw something away and not have to think about it, it’s not responsible. Electronic equipment is notorious for containing components made up of toxic chemicals that, if not disposed of properly, will leak into the environment and do some serious damage. Plus, it’s often the case that people will toss aside perfectly-good-and-working technology just because they’ve got a hankering for an upgrade.

Don’t be wasteful with your old technology. Consider these three options instead:

Resell Your Old Equipment for and Repurpose the Funds
Your most profitable scenario involves you selling your old equipment. Though, don’t get your hopes up that you’ll be able to find a buyer for every old piece of tech. As explained by Kyle Bittner of Exit Technologies, “If it’s junk from 1985, it would be a waste of time to pursue reselling the product. If it’s decent stuff from 2004, it’s probably still worth thousands of dollars that could return capital to the budget.”

The Internet provides consumers with several great platforms for users to sell their used equipment, with websites like eBay, Craigslist, Amazon Marketplace, and more. Before posting an ad to sell your old tech, be sure to spend time researching its value so that you’ll get the biggest return on your investment. If you’re not sure if your item is worth selling or not, then ask the IT pros at NuTech Services. We’ve got a good grasp on the market and we’re always happy to give helpful advice.

Donate Your Old Tech and Feel Good about Yourself
Instead of throwing away perfectly good tech, why not donate it to someone or some organization that can use it? If it’s got plenty more miles left on it and you don’t want to go through the hassle of finding a buyer, then it might be easier just to give it away. You might have an employee that would appreciate getting an old workstation for private use, or maybe there’s a nonprofit organization in your community in need of a gently-used server unit.

When donating old equipment, just be sure that you’ve completely wiped the data from the hard drive. Or, better yet, do the recipient of the gift a favor and just go ahead and replace the old hard drive so that they’ll not have to work with a drive that’s old and prone to crashing. Replacing the hard drive will completely eliminate the risk of the next user uncovering sensitive files. NuTech Services can help with both wiping the data completely from your old drive and swapping out the old hard drive for a new one.

Repurpose Your Old Tech and Save Money
Before you say goodbye to your old technology, take a look around your office and see if you can find a place where it can come in handy.

For example, it’s always a good idea to have a backup PC handy, just in case one of your working units were to unexpectedly crash. Plus, you can always repurpose an old workstation into a server with a dedicated task, like hosting your company’s email, handling the printer traffic, or hosting one specific application. Repurposing an old PC like this can free up resources on your network, but reconfiguring the old equipment can be an involved process, so you’ll want to have an IT professional lend a helping hand.

All of these options are far better than just throwing out your old equipment and having it muck up the environment. NuTech Services can help assist you with all of these green options. We can even help recycle your old tech in an environmentally-friendly way that you can feel good about. Call us today at 810.230.9455 to learn more.