202171506_social_media_400.jpg

Social Media is Being Scrutinized

202171506_social_media_400.jpg

It’s probably fair to label social media as one of the greatest inventions of the 21st century. Nearly half of the world’s population are active users of social media; and, that number would almost certainly be higher if more people had access to unencumbered broadband. Over the past few weeks, however, one of the most utilized social media services, the microblogging website Twitter, has sparked some controversy after they added an amendment to a tweet sent by the U.S. President Donald Trump suggesting it contained “potentially misleading information”. Today, we’ll briefly discuss what this showdown with the White House means for social media companies. 

To start, let’s go back a few years. In the aftermath of the 2016 Presidential election, another major social media company, Facebook, was under fire for allowing foreign companies to influence the outcome of the election through insite advertising. Google and Twitter were also caught up in the mess, but the scrutiny Facebook saw during the ordeal, well…really hasn’t gone away. 

The result was hearings, lots of hearings. The debate whether social media advertising–if it is broadcasting hateful, divisive, or misleading information–should be allowed on these platforms rages forward. Facebook stood by the First Amendment, even as it was embroiled in the Cambridge Analytica mess. Twitter, took a different approach. They enacted a Civic Integrity Policy. This policy allows them to mark political posts that contain false information. CEO Jack Dorsey stated, “We’ll continue to point out incorrect or disputed information about elections globally. And we will admit to and own any mistakes we make.”

This action was implemented on a Presidential tweet, and it has drawn the ire of the White House. They immediately stated that this policy allegedly prioritizes perspectives that ignore a conservative point of view. Twitter denies this.

Trump’s reaction to this was swift. The President signed executive order #13925 – Preventing Online Censorship, which gives the Federal Communications Commission the power to regulate social media’s censorship practices.

Soon after, the Center for Democracy and Technology filed a federal lawsuit with the President as the defendant stating that the executive order is unconstitutional and violates the company’s First Amendment rights. Whether a company is entitled to rights, will be a major point of contention in the days ahead. The CDT went on record stating that, because of the executive order, tech company executives believe it will actually work to limit free speech, as businesses will err on the side of caution to avoid risk of crossing federal regulators.

Do you believe that it is responsible for social media companies to warn viewers that powerful people could be lying? Leave your thoughts in the comments section below. Please be respectful.

Facebook_290074543_400.jpg

Facebook and Your Privacy (Part 3)

Facebook_290074543_400.jpg

Facebook’s servers process a massive amount of data each day… which only makes sense, considering their 2.4 billion active users. Unfortunately, the social network has had some issues over the past few years with data privacy. Whether you use Facebook as a social networking tool for your personal life, your business, or both, you need to know how to best take control of your own privacy on the platform.

While we wish we could show you how to really accomplish true privacy on Facebook, the only way to actually reach that threshold would require you to have never signed up in the first place. This doesn’t mean, of course, that there is nothing that you can do now to protect your information – sharing more cognizantly and keeping it within circles you trust.

A Few of Facebook’s Issues

Like we said, Facebook has seen some pretty egregious security issues during its time. While we aren’t going to go too far into the weeds with these events, a quick summary might help to illustrate how careful users should really be as they use the platform:

  • In 2007, Facebook introduced a feature that would allow companies to track purchases made by users and notify their friends of what they had purchased… without requiring any consent from the user.
  • In 2011, the FTC charged Facebook for allowing private user information to be accessed by third parties, making this private information public without any notification.
  • In 2013, Facebook introduced a Donate button that would allow users to make charitable contributions to such organizations. Unfortunately, a bug in the code allowed the email addresses and phone numbers of over six million users to be leaked.
  • In 2014, Facebook actively experimented upon their users, testing their ability to manipulate their emotional states with the content the user is exposed to. Depressing content was prioritized to see if they could elicit depressed feelings. As it turns out, they can.
  • In 2015, Facebook took action to assuage their users’ concern for their privacy, and rolled back the access that apps had to user data… but one has to wonder, just how much were applications privy to before this rollback?
  • In 2018, Facebook suffered a massive data breach, losing the data of 50 million users. In response, Facebook did nothing… that is, until their reputation started to suffer. It was only then that they responded to the underlying issues.

Unfortunately, concerning events like these happen far too regularly to Facebook. There just seems to be difficulty in keeping their user data secure. This is why you need to pay particular attention to the settings on your own Facebook profile. Let’s go over how your information can most effectively be protected by ensuring these settings are configured properly.

Configuring Your Facebook Privacy Options

On your desktop, log in to your Facebook account. At the top-right of the page, there will be a small down arrow. Click it to access a menu, then click Settings.

You will be brought to another page, with Privacy in your list of options. Click into it.

From here, you can set your privacy options that restrict who has access to your information. For example:

Public – Setting your privacy to public is effectively turning off your privacy options. Not only can all other Facebook users potentially see your profile, even people who aren’t signed in could access it. Hypothetically, this means that the search engines could find you are well.

Friends – This setting restricts viewing privileges to only your confirmed Facebook friends.

Friends except… – If there are particular friends or members of a particular group who shouldn’t see certain information, you can prevent them from seeing this on their Facebook.

Only me – This means that (outside of Facebook) you are the only person with access to what you have posted. Just to be safe, we recommend that you still refrain from sharing anything that you wouldn’t be comfortable sharing publicly.

You also have the ability to choose the audience for each individual post. While this may give the impression of improved control over your privacy, the biggest threat to your Facebook security is probably Facebook itself.

Of course, that doesn’t mean that you aren’t given plenty of privacy options to play with. Let’s go over some of them now:

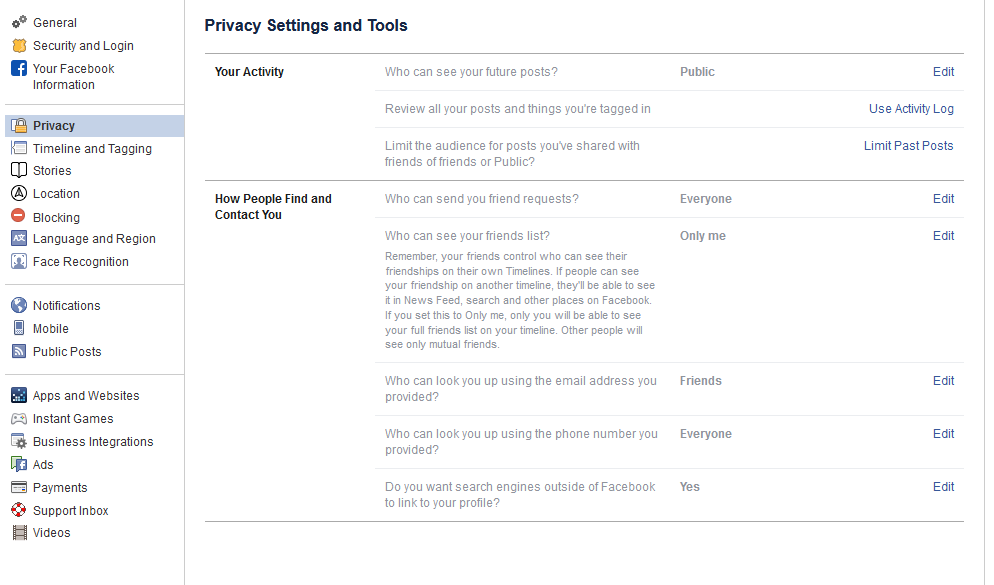
Who can see your future posts? This setting establishes a default privacy setting for the content you post on Facebook in the future. This helps insulate you from sharing content out to those who shouldn’t see it.

Review all your posts and things you’re tagged in. By using the Activity Log, you can review the entirety of your timeline and manage the permission settings of past posts. You can also review posts you have been tagged in from here.

Limit the audience for posts you’ve shared with friends of friends or Public. This is a semi-nuclear option when it comes to locking down what you’ve posted in the past. By clicking Limit Past Posts, you can change all of what you posted publicly or to friends of your friends to only be accessible to those on your Friends list. Fair warning – Facebook doesn’t provide any way to revert this, so you would have to go through your posts by hand to change them back if you so wished.

Who can send you friend requests? Depending on your preference, you have the option of picking between Everyone or Friends of friends. Unlike many of the other settings on this list, leaving this set to Everyone is probably okay.

Who can see your friends list? On the other hand, there is no reason that the rest of the world needs to see who you are connected with on Facebook. Setting this to Only me will keep this information between you and Facebook, nobody else.

Who can look you up using the email address you provided? Do you want someone who has your email to be able to find you on Facebook using it? Most likely not – so restricting this to Friends or Only me is probably in your best interest.

Who can look you up using the phone number you provided? Again, it’s really your call whether or not to allow Facebook users to find you via your phone number, but it really isn’t that necessary. You’re fine setting this to Friends or Only me.

Do you want search engines outside of Facebook to link to your profile? This one really depends on your situation. Facebook can work to prevent the assorted search engines out there, including Google and Bing, from indexing your profile (allowing searchers to find it). Most people will likely want to switch this off, but if your personal brand is part of your business, it makes more sense to turn this option to Yes.

Dictating What Others Can Do On Your Personal Facebook Profile

We all have embarrassing friends, and so you may want to avoid having them be able to freely post content to your wall – for instance, your college buddy Greg seems to have no problem with sharing candids from the good ol’ days… and tagging you in them.

Potential situations like this make it all the better that Facebook gives you control over who can post to your timeline, and who can see this content. You can access your many options to do so by clicking into Timeline and Tagging (which can be found on the left side of your Settings).

Who can post on your timeline? Naturally, you will definitely want to put a limit on this, as there is no reason that a total stranger should be reaching out on your personal profile. This is why it makes sense to only allow your Friends to do so – or, perhaps you alone with the Only me setting.

Who can see what others post on your timeline? This setting will largely depend upon who you have permitted to post on your timeline. If your Friends can post to your timeline, you definitely want your Friends to be the only ones who can see it – assuming you don’t want to maximize your privacy (and hedge your bets) with the Only me setting.

Allow others to share your posts to their stories? Ask yourself: do you want anything you post publicly to be shared by your Friends? If so, leave this one enabled.

Who can see the posts you’re tagged in on your timeline? Tagging can be an incredibly useful thing for someone trying to cultivate an image as an engaged thought leader, but it can also hurt your reputation, never mind your privacy. If people keep tagging you in assorted posts and you’d rather the public at large didn’t see these posts, you can keep these posts to your Friends, or even to Only me.

Review the posts you’re tagged in before the post appears on your timeline?
Alternatively, this is likely the best option for someone looking to be visible via tagged posts, while still remaining in control of which posts that are linked to them. Basically, you can be notified if you are ever tagged in some Facebook content, and can opt whether or not it will appear on your timeline. Fair warning – any mutual friends you have with the person who has tagged you will be able to see the tagged content before you have a chance to review it. Regardless, it is best to keep this setting on.

Review tags people add to your posts before the tags appear on Facebook? Again, this is something you’ll want control over, so set this to on as well.

Managing Your Public Post Settings

Again, from the Settings page, click into the Public Posts option on the left-hand side.

Who Can Follow Me – Rather than adding users as Friends, public figures can provide the option to just be followed by interested people. If you want to give the public at large this option, set this to Public. Otherwise, you can keep your posts among your Friends by setting this to Friends.

Public Post Comments – Or, who can comment on the posts that you’ve shared publicly. It is probably best to keep this restricted to either Friends, or perhaps Friends of Friends.

Public Profile Info – Some facets of your Facebook profile are generally available for anyone to see (like your name and profile picture). Who do you want to be able to comment on your profile picture? Keeping this capability restricted to your Friends or – maybe – Friends of Friends is probably best.

How Much Do You Want Facebook to Know About Where You Are?

Facebook has the capability to track your location history. While this information isn’t shared with your Friends or followers (beyond letting your Friends know that you are nearby), the only real reason we could come up with for Facebook to track this is to be able to target you with ads more effectively. Hopefully, that’s the reason, but even so, it is better to be safe than sorry. After all, Facebook has a history of data security missteps.

Again, starting from the Settings page, click where it says Location on the left-hand side. From there, you can see what Facebook already knows by requesting to View your Location History. However, to disable this, you’ll need to use the mobile application.

Using the Mobile Application to Turn Off Location

From the app, access the 3-bar hamburger icon (found at the top-right), and scroll down until you see Settings & Privacy. From there, you should access Privacy Shortcuts, where you’ll see a new area with various settings and documentation regarding Facebook’s identity controls.

Find Manage your location settings (you shouldn’t have to scroll to find it). Once there, you should:

  • Turn off Location History (found in Location Access)
  • Turn off Use Location (in Location Services)
  • Find and disable Background Location

While you’re at it, you may as well delete your existing Location History.
Again, from within Privacy Shortcuts, select Manage your location settings and then View Your Location History. You will be asked for your password, and then you will see another 3-dot menu in the top-right. From there, you should Delete all location history.

Take note: if you post a photo with your location tagged, or check into some public place, you may be allowing Facebook access to your location data again.

Yes, this is a lot to take in.

Thank you for sticking with us for so long! We hope this helps you to secure your personal privacy on what is known as the social network. To learn more about protecting your privacy and information, geared more toward your business, reach out to NuTech Services at 810.230.9455, and make sure to subscribe to our blog.

Facebook_285250526_400.jpg

Facebook and Your Privacy (Part 2)

Facebook_285250526_400.jpg

Wait! If you haven’t read part one of our Facebook privacy blog yet, you may want to do that before reading this one. If you’re ready, we’ll be taking an in-depth look at your Facebook settings to make sure that your account and its data are as secure as possible. If we’re being honest, protecting this kind of data hasn’t seemed to be one of the platform’s strong suits – and user privacy has been the star of many lists of concern.

That’s why we wanted to make sure that you knew how to reclaim your personal data and make sure it is protected. We’ll start by protecting the information that you’ve shared.

To do this, you will want to access your Facebook account on a computer. This is going to be a lot to manage, and the mobile app would only be too much trouble to navigate.

Your Security and Privacy Options

From any page on Facebook, look for the menu, which will appear as a little downward-facing arrow. This should be at the top right-hand corner of the page. Click into Settings. This little arrow is your lifeline during this process, you can always find your way back to the beginning with that menu.

Verify the Accuracy of Your General Account Settings

Your first order of business should be to confirm that you still have access to all of the email accounts tied to your Facebook. If an account that you no longer have access to was used, account recovery becomes monumentally more difficult.

Find Out Where You’ve Used Facebook with Security and Login

On the right, you should see the Security and Login option. Click it, and Facebook will show you all of the devices where your account is logged in. Fair warning, this can be shocking – especially since it includes where and when you last used that device, and what browser you were using to do so. The longer a user has been engaged with Facebook, the more devices will likely show up here.

If one of these devices is one that you don’t recognize, you will want to change your password immediately – we’ll go over how in a moment. First, you will want to log out of Facebook on any device that you aren’t actively using. This can be done through the three-dot icon menus next to each device listed.

Change Your Password

While we’re on the topic, this is when you will want to make it a point to update your password. It will only take a minute and might just help keep your Facebook friends from being spammed and phished. You can do this using the process provided on the Security and Login page.

Remember, you should never use a password for more than one online account.

Using Two-Factor Authentication

After your password settings, you’ll see the option to set up two-factor authentication (2FA) to help protect your account. To set it up, select Use two-factor authentication and click edit, and Facebook will provide you with the instructions you need to follow. Click Get Started

You have two options to select from as your Security Method, either using an authentication app, or to receive a text message with an additional code. Between the two, the application is the more secure option, although it does mean you need to have access to the mobile device whenever you want to check your Facebook.

Setting up the authentication app option is pretty simple. Open your application (which, if you have a Google account, might as well be Google Authenticator) and, on the computer, select the Authentication App option, as pictured, and click Next

Facebook will display a QR code, which your authenticator app should allow you to scan when you add a new account to it. The app will then give you a six-digit number to provide to Facebook as a Confirmation Code. Simple.

If you decide to use the text message option, Facebook will simply send you a code that you have to provide upon login. It isn’t quite as secure as the app, but it will do. All you have to do to configure this is to confirm an initial code with Facebook, and you’ll be walked through the rest.

Add a Backup

Once you have two-factor authentication enabled, it only makes sense to add an additional means of 2FA as an emergency backup – in this case, whichever method you didn’t choose. Honestly, you might as well set up both, and make use of the Recovery Codes option, to boot.

Under the Add a Backup option on the Two-Factor settings page, there is also a Recovery Codes option. By clicking Setup, Facebook will provide a brief explanation, and the opportunity to Get Codes. Facebook currently gives you a list of 10 single-use 2FA codes. These are one-shot codes, but you can generate a new list whenever you want from the Two-Factor Settings page. Make sure you keep these codes in a safe place.

Setting Up Extra Security

Back on the Security and Login page, scroll down to find Setting Up Extra Security. This area lets you opt-in to alerts being sent via email or text, notification, or Facebook Messenger.

You can also Choose 3 to 5 Friends to Contact if you do find yourself locked out of your account. Make sure that these are people you truly trust.

Stay tuned for part three of this series, coming soon.

Privacy_307095170_400.jpg

Facebook and Your Privacy (Part 1)

Privacy_307095170_400.jpg

Two billion users strong, Facebook is one of the Internet’s most popular websites… which has frequently put the tech giant in the spotlight when it comes to how secure the data you’ve entrusted to them (in addition to what they’ve collected) really is. Today, we’ll discuss how you can access the information Facebook has on you.

What Does Facebook Know About Me?

Consider how many opportunities Facebook has to collect information about you: there’s quite a few. For one thing, you literally tell the platform the things you “Like.” Semi-joking aside, there’s also the stuff you post, which advertisements attract your attention, and many other means for them to construct a pretty solid profile on you.

You can see this profile for yourself. In the aftermath of the Cambridge Analytica scandal – where third-party users were granted free reign and access to Facebook user info – Facebook made a promise to be more transparent. This profile is part of that transparency.

Viewing this information is pretty simple, whether you’re on your computer or you’re using the mobile application.

On a desktop or laptop:

  1. Log in to your Facebook account.
  2. Click the down arrow on the top right and go to Settings.
  3. On the left, click Your Facebook Information.
  4. Facebook will present you with five options. Look for Download Your Information.
  5. Click View, Facebook will give you a screen where you can choose the date range and format of the data. Since we want to download everything, we’re going to set the Date Range to All of my data and set Media Quality to High. This will give us a higher quality version of all of our photos and videos in the download.
  6. Click Create File and Facebook will start building the download. This can take a while, but Facebook will give you a notification when your data is ready for download.
  7. Once Facebook gives you the notification, click it and Download your data.

From the Facebook mobile app:

  1. Tap the 3-bar hamburger icon in the top right of the app.
  2. Scroll down and tap Settings & Privacy, and then tap Settings.
  3. Tap Download Your Information.
  4. Leave all of the options checked, and scroll down. Ensure the Date Range is set to All of my data and that Media Quality is set to High.
  5. Tap Create File and Facebook will give you a notification when the data is ready for download.

The “data is ready” notification will probably come after about an hour – it really depends on how long you’ve been a user, and how active you’ve been. Most people will probably have a file that takes up a few gigabytes.

Now that the report is available to you, click on Your Facebook Information.

Access Your Information – Facebook provides you with an itemized and viewable list of your Posts, Photos, and Location history ready for viewing.

Activity Log – Consider this a comprehensive timeline recap – almost a scrapbook, prepared by Facebook.

Deactivation and Deletion – People used to complain that deleting a Facebook account was a difficult process. Not anymore!

So, How Much Does Facebook Know About Me?

When you do review your file, the information they have can be shocking, mainly due to the location-based aspect of it all. You can pull up a given day and find out exactly where you were and what you did. Facebook kept track for you.

Then, you need to consider the Ads. This section will show you all of the advertisers who provided Facebook with a contact list your name appeared on. It isn’t that Facebook gave away this information, advertisers already had it and gave it to Facebook to target you on the platform.

What Does This Mean?

While it completely makes sense that Facebook would know a lot about you, seeing it all laid out (and how much of it didn’t come from your profile) isn’t exactly comforting… Facebook has been too involved in a few major data breaches. Just think – there’s a profile just like the one you retrieved about you, for over a quarter of all of the people in the world.

This rabbit hole goes deeper, too. Make sure you check back soon for part two of three of this Facebook privacy blog series.

You probably had a notion that Facebook had a bunch of your information, but how much information outside of your general profile makes you nervous when they are accused of major data breaches. What’s scarier is that the service is used by over a quarter of the world’s population. 

This is only the tip of the iceberg of the information we will share about this social media giant. Check back for part two of our three-part blog series about Facebook privacy.

kyt_sm_400.jpg

Know Your Tech: Social Media

kyt_sm_400.jpg

You see the term “social media” thrown around all the time, but what does it mean for both individual users and whole businesses? Organizations that understand the importance of social media have a unique advantage over other businesses in the same industry, be it a way to attract more consumers or a way to protect against common security threats that find their home on these websites.

What is Social Media?
Social media can be considered any website or service that is used to interact socially with other people. Some common examples include Facebook, Twitter, LinkedIn, and even Instagram. All of these services have common ground in regard to features that allow people to communicate or learn more about one another, whether it’s in the form of a terribly-worded Facebook post or a bite-sized glimpse into someone’s soul via Twitter. LinkedIn allows business professionals to learn more about each other by providing information about their work history or current situation, which can be quite helpful for learning more about a company or a prospective client.

Social media is generally used more for the former, though. It’s likely that your employees have at least one account on a social media platform, so it’s important that your organization understands what it means for the purposes of security.

Security Issues of Social Media
One of the biggest issues regarding social media is that it can provide hackers with a way to get into your organization’s network–or, rather, trick your employees into providing information that could aid them in their attack. Hackers can create fake accounts where they can impersonate people you may know. They then use this process to weasel information from your employees such as usernames or passwords. You need to make sure that your employees are aware of the telltale signs of social media attacks so you know they won’t be an issue for your organization.

Social Media as an Outreach Method
Many organizations have turned to social media as a way to directly interact with consumers. Take, for example, Verizon. If you tweet at their support account, there is a solid chance that they will address any problems you might be having with your mobile service. You can use social media in this regard to directly reach out to customers and get their feedback about your products or services.

How does your business use social media? Let us know in the comments, and be sure to subscribe to our blog.

time_spent_on_sites_400.jpg

How Much Time Do You Spend on These Websites?

time_spent_on_sites_400.jpg

The Internet is massive. It’s simultaneously a never-ending shopping mall, the biggest library that you’ve ever seen, and movie theater. According to a study conducted by MIT, the average American now spends a full day of their week (24 hours) online…and that’s just an average. We all know people who are locked into the Internet from the moment they wake up and stay locked in until they go to sleep. Surprisingly, people only spend their time on a handful of the over 644 million websites that populate the Internet. Today we will take a look at the four most visited sites on the Internet and examine why users spend so much time visiting them.

Google.com
I don’t think anyone would be surprised to find out that Google was the most visited site on the Internet. As the most popular (and best) search engine on the web, it is the most useful site. After all, when you search for something on the Internet (whether you use Google.com or not), it’s referred to as “googling”. This just speaks to its transcendence in the consciousness of Internet users everywhere.

The Google homepage is extraordinarily simple with no advertisements and options to access Google-based products and services and provides a legendary ease of use. Simply type (or speak) your query in the Google bar and wham, you have results. In 2017, nearly 70 percent of all web searches were done using Google.com. Results pages give visitors a lot of options, and do have advertisements, but Google has made certain that the ad space they sell is qualified and is represented on the page much like the non-ad content, as to not distract the user. Some options they give visitors include search query results, access to media, access to contact information, access to immediate information (if available), and suggestions for other queries you may use to get the answers you want. Add it all up and Google has become the most visited site on the Internet because it brings a lot of value to each and every user.

YouTube.com
Consider for a moment that the video streaming service YouTube may just be human’s greatest resource. Who among us hasn’t gone onto YouTube to view a tutorial about something or other? People continuously seek knowledge and today’s person is much more comfortable taking their information in video form than they are through reading. YouTube is a website that shows you just how helpful people can be when they have information they are willing to share.

YouTube’s search engine is technically the second largest of its kind on the Internet, and if you think that figure is impressive, consider one more tidbit: at any given time, half of the Internet is viewing YouTube. Whether you are looking to be educated or entertained, YouTube is a one-stop shop.

For businesses it’s more a mixed bag. There is no doubt that the marketing opportunities provided by YouTube can be a great way to get your message out to potential customers, but the drains that YouTube can have on employee productivity are substantial. In fact, some businesses have suggested that they lose upwards of seven hours per week per employee (or about 18% of total productivity), so if you are going to allow your staff access to YouTube at work (which statistics show you should), make sure that you have a system in place that can work to limit employee access to training materials and other educational channels and not time-wasting channels.

Facebook.com
Over two billion people actively use Facebook. Today, it’s used to run events, sell products and services, and express opinions. Since so many people utilize the service, anything you need to do as far as virtual networking can be done using Facebook.

It has a lot of attractive integrated applications, but no single application has as big of an effect on the use of Facebook as Facebook Messenger. The messaging application sets Facebook apart from all other social networks as it integrates with most computing platforms to provide feature-rich text messaging to other people using the service. Beyond Messenger, there are countless other ways to connect with people on Facebook. Games, discussion groups, and much, much more make Facebook the go-to resource for social networking on the web.

Like YouTube, Facebook can be a big drain on productivity. One study found that Facebook costs U.S.-based businesses upwards of $28 billion a year. That’s about 1.5 percent of all potential productivity lost to political memes, friend’s statuses, and event planning, so be sure to monitor your network for Facebook usage and limit it as necessary.

Reddit.com
Reddit is the largest online forum website and has made it up to the top four because of the amount of time people spend on it. As the self-proclaimed “front page of the Internet”, it has become the site where people spend the most time. There is no other website that has the combination of controversy, information, entertainment, and potential distraction that Reddit has. There are literally thousands of different topics being discussed in forums, called subreddits. Any hobby, platform, opinion, or fact probably has its own subreddit. Since users can search through them, and quickly become engaged, time can melt away pretty quickly.

Of all the sites that a business should consider blocking, Reddit has to be at the top. By allowing it to be accessed by your staff, there is a distinct possibility that you are just tossing money down the drain. So, while it is extremely useful for anyone that wants to learn or discuss variables about issues that are relevant today, Reddit is most certainly an enemy of productivity.

Everyone knows that the Internet is a great resource, but it can also be a huge waste of an organization time–and that is a resource you can’t get back. For more information about instituting a content filter to ensure that your staff is focused on the things they should be while at work call NuTech Services today at 810.230.9455.

facebook_followers_400.jpg

Tip of the Week: Make Facebook More Private By Enabling the Follow Feature

facebook_followers_400.jpg

While it’s a security best practice to keep strangers off of your Facebook account, you might feel that it’s understandable to accept an unknown request for the sake of networking or otherwise. This isn’t the ideal way to approach Facebook, but you do have a unique opportunity to allow users to view your profile and follow your public posts, without the need to accept a friend request.

This feature is called “follow,” which limits who can send you actual friend requests while still allowing some users to view your public posts. This is important primarily because hackers and scammers will often create fake profiles in an attempt to connect with potential victims. Their target might be sensitive credentials or other important information, so it’s important to avoid friend requests from people who you may not know.

To allow users to follow your profile and prevent users who don’t know who you are from sending friend requests, follow these instructions.

First, log into your Facebook account. If you’re using a desktop, select the down-arrow in the top right corner of Facebook. Once you’ve done so, click on Settings, which will be at the bottom.

Doing so will open up the General Account Settings. In the left column, notice the sub-categories for Facebook’s settings. You want to click on Privacy first.

In the Privacy Settings and Tools page, you’ll see sections that allow you to control who sees what you post on Facebook. The first option you want to find is the Who can contact me? Section. Click the Edit option and change the setting to Friends of friends. By doing so, you’ll be safe from friend requests from all but those who are currently on one of your friends’ rosters, and you’ll be able to send your own invitations in the same way as before.

If you want to give someone the ability to see what you post without accepting a friend request, you can enable public posts. This lets you share what you post, such as articles from your industry or professional development, without sharing personal posts that are meant for only your friends–effectively allowing you to split up your personal and professional posts. Just scroll down to Public Posts in the left column and open up the Public Post Filters and Tools page. Next, in the Who Can Follow Me section, select Public. Now you can select Public to make posts available to Followers, or Friends for posts meant only for your friends.

Granted, even with all of these measures, you still need to practice healthy skepticism when dealing with users on social media platforms. You never know who your latest friend could be, as it’s easy enough to hide behind the facade of an online account and pretend to be someone else. To learn more about how you can protect your business from online threats, reach out to us at 810.230.9455.

facebook_safety_check_400.jpg

In Case of Emergency, Activate Facebook’s Safety Check

facebook_safety_check_400.jpg

In 2014, Facebook launched Safety Check, a helpful tool allowing users to “check in” that they’re okay during a crisis event, like a natural disaster, mass shooting, etc. Recently, Facebook made a major change to Safety Check by allowing users affected by the crisis to activate the feature. This is yet another example of how social media is changing the way people find out about major events and react to them.

To give you an idea of the sizeable difference this change makes, consider the fact that in the first year of Safety Check (when it was exclusively controlled by Facebook), the feature was activated 39 times worldwide. Since the change was made in December of 2015, Safety Check was activated a total of 328 times over the following six months. That is a significant number of crisis situations that would have been overlooked if Facebook alone was at the helm.

Rest assured, Facebook is still involved in Safety Check’s activation process. Otherwise, jokesters and Internet trolls would surely abuse the tool and “cry wolf” every chance they get, which would effectively render the tool useless. To prevent this, Facebook has a two-step activation system.

  • Step 1: A user submits a crisis event to Facebook they deem to be worthy of Safety Check activation.
  • Step 2: Facebook checks on the validity of the event by analyzing the chatter over its social network, along with third party organizations.

If the crisis event makes it through rigors of this automated process, then Safety Check is activated and those affected can begin “checking in” that they’re okay.

Of course, the Internet being the Internet, there will always be those who make light of a crisis situation by “checking in” on Safety Check events that have nothing to do with them. However, this annoyance aside, society can only benefit from the public having a tool like Safety Check to quickly notify scores of friends and family of one’s status during a crisis.

Have you used Facebook’s Safety Check to notify your friends that you’re okay? If so, then share with us in the comments if you’ve found this tool to be useful or not.

facebook_info_download_400.jpg

Tip of the Week: A Step-By-Step Guide to Downloading Your Facebook Information

facebook_info_download_400.jpg

The longer you use Facebook, the more personal content you hand over to the social media empire. Sharing content is what drives the social media experience, but what if you want your content back? Surprisingly, Facebook makes this easy.

The reasons to download your personal content from Facebook can vary. Perhaps you just feel better about having a backup copy of your data stored locally. Or maybe you’re working on a picture collage and want to use several of the images you’ve uploaded to Facebook. Or, as is more often the case, perhaps you’re fed up with Facebook and you want to leave it for good, but before you close your account, you would like to download your data.

Whatever your reason may be for needing to download your personal data, Facebook makes it easy. After all, it’s not like Facebook has any reason to make this process difficult, since they technically own whatever content you upload, whether or not you download it back or even close your account.

To get started, log in to Facebook and go to Settings. Below General Account Settings you will see Download a copy of your Facebook data, click on it. Next, click Start My Archive.

This will allow you to select a place to store your information, just like you would with any Internet download. Whichever folder you select to download your Facebook data into, make sure that’s it’s secure, seeing as it will likely contain sensitive data.

What kind of information is included when you download your archive? Facebook explains, “This includes a lot of the same information available to you in your account and activity log, including your Timeline info, posts you have shared, messages, photos and more. Additionally, it includes information that is not available simply by logging into your account, like the ads you have clicked on, data like the IP addresses that are logged when you log into or out of Facebook, and more.”

Depending on how much you’ve used Facebook in the past, this can be a rather large download. Although, at the end of the day, downloading everything in one fell swoop is much more convenient than going through every single Facebook post, selecting what to and what not to download.

For more useful tips and technology best practices, be sure to subscribe to NuTech Services’s blog for a new tip every week!

b2ap3_thumbnail_facebook_security_400.jpg

Tip of the Week: 3 Facebook Security Tips to Protect You and Your Friends

b2ap3_thumbnail_facebook_security_400.jpgWith social media playing such an important role in everyone’s day-to-day lives, one has to wonder to what degree this affects the security of online accounts and profiles. Social media might have revolutionized the way we communicate with others, but it’s also revolutionized the way that hackers stalk their victims. How vulnerable are you and the people you love when it comes to your Facebook settings?

Imagine this worst-case scenario. Hackers can impersonate your friends or the people you trust easily enough. If your profiles are set to public, nothing is stopping them from browsing your personal information (phone number, email, address), posts on your wall, pictures, videos, and more. This is all information that helps hackers determine how and when they will target you, or worse, the people you know.

The unique issue with social media attacks is that hackers can take advantage of both digital and physical variables in their favor, making it extra important that you take the proper precautions with your approach to social media. To avoid these unnerving possibilities, try these three tips to lock down your Facebook account.

Use the Privacy Checkup Shortcut
Upon clicking the padlock icon in the top-right corner of Facebook (near your notifications), you’ll notice that there’s a new feature called privacy shortcuts. These allow you to quickly and efficiently access some of Facebook’s best privacy and security features. By clicking on the Privacy Checkup button, a friendly bipedal blue dinosaur will guide you through a short process. You can set your default post status (public, private, etc), the apps that have access to your account, and certain parts of your profile information. You can then choose to view your profile as either one of your friends, or a stranger, to see if the changes you made were to your specifications.

The privacy shortcuts also provide you with opportunities to access other settings, like who can contact you via inbox or friend request, and how you can get someone to leave you alone. At the bottom of the drop-down, you can access even more privacy settings.

Enable Login Notifications
You probably know someone who has had their Facebook account hacked. This happens because people are unaware that their accounts have been compromised. Facebook has a measure dedicated to informing you of when someone logs into your account, and from where. You can receive these notifications either through your Facebook notification bar, email, or text messaging.

Facebook also allows you to see where your account is currently logged in, as well as the last location the device connected from. This includes device, operating system, and physical location, effectively allowing you to eliminate suspicious activity before too much damage is done. Click End Activity, which will give them the boot and give you some time to change your password.

Take Advantage of Two-Factor Authentication
Facebook has two-factor authentication, too, which uses a PIN sent to your smartphone to act as an additional login credential. You can also access the Code Generator application on your mobile phone, which gives you a security code that lets you access your account. This helps keep your account open to you, and only you.

Security is more important than ever, especially when we’re all connected through the Internet. It’s important to always keep the security of both yourself, your friends, and family in mind, by spreading best practices related to security protocol. Share this article on Facebook to get the word out.