excelSpreadsheet_399797193_400.jpg

Tip of the Week: Explaining Excel Formulas

excelSpreadsheet_399797193_400.jpg

Just under its surface, Microsoft Excel offers a massive variety of functions and features…far more than we could ever realistically cover in this blog. However, there are a few that stand out as relatively essential, particularly to businesses. Let’s go through these functions, starting with how to use them.

How Excel Formulas Work

Once you have a cell selected, you can type one of these formulas into the cell or the formula bar. Keep in mind that all Excel formulas begin with an equals sign, before the type of formula is specified and the appropriate data points are identified. If properly formatted, your spreadsheet can thereby be automated to do a huge variety of tasks based on the data you’ve input.

Here are some common formulas that you could find useful in your business’ operations.

=SUM()

This allows you to total up the value of the cells you’ve selected, making it far simpler to add up long lists of numbers. Let’s say you had a list made up in Column B, beginning at Row 2 and ending with Row 46. To total these numbers, you’d type up =SUM(B2:B46), and that cell would display the total as a result.

=AVERAGE()

In the same vein, =AVERAGE does the same thing, except it produces the average amongst those selected cells. =AVERAGE(X1,Y2,Z3) would give you the average of X1, Y2, and Z3.

=CEILING() and =FLOOR()

These functions allow you to round numbers to the nearest multiple of significance that you’ve established. Dictating =CEILING(F2,5) with F2 being populated with 368 would round up to 370. On the other end of the spectrum, =FLOOR(F2,5) would round down to 365.

=CONCATENATE()

Excel can also track changes in text too, with =CONCATENATE allowing you to tie different text strings together. For instance, if G7 read The 3-2-1 Backup Rule and K12 read helps to ensure your data backup is safe, entering =CONCATENATE(G7,” “,K12) would tie the phrases together and give you The 3-2-1 Backup Rule helps to ensure your data backup is safe. You can also format the formula as =CONCATENATE(G7&” “&K12) for the same results.
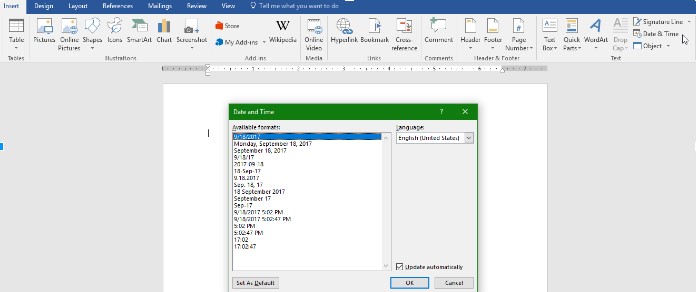
=NOW()

This formula will populate a cell with the current date and time, which helps you keep track of when your data was put into the spreadsheet.

=TODAY(), et alia.

There are a number of functions that do a similar thing to =NOW(), such as:

  • =TODAY(), which populates a cell with the current date
  • =DAY(TODAY()), which populates a cell with the current day of the month
  • =MONTH(TODAY()), which populates a cell with the current month, represented as a numerical value between 1 and 12

=TIME(), et alia.

In a similar vein, various functions allow you to track the exact time that data has been added to your spreadsheet.

  • =TIME() inserts a set time, so long as you format it as a serial number with the hours, minutes, and seconds, which will be converted into a standard format. So, =TIME(13,41,28) would produce 1:41 PM.
  • =HOUR(NOW()) populates a cell with the current hour as a value between 0 and 23 (12 AM to 11 PM).
  • =MINUTE(NOW()) does the same with the current minute, between 0 to 59.
  • =SECOND(NOW()) does the same with the current second, again, between 0 to 59.

=VLOOKUP() and =HLOOKUP()

Vertical lookup and horizontal lookup enable you to seek out a specific value in one column or row and produce the data that is associated with it. Let’s say that you have a table that outlines your business’ assorted costs, perhaps giving you the total, how much is invested into different aspects, and such. These Excel functions allow you to select certain data points as a reference so you can ascertain the relationship between different values.

=IF()

Using =IF() gives you a quick and easy reference to check whether a set condition is true or false in reference to your data. Let’s say you’ve calculated out the returns on investment that some of your business initiatives have produced. Using =IF(), you can generate a clear yes or no answer to whether or not an initiative has seen the returns you wanted it to. Maybe you wanted to weed out any initiatives that saw less than 2% ROI, with the ROI of each occupying a cell in Column E. Using =IF(E1>0.02,”Yes”,”No”) and dragging that formula down to match the cells in Column E will give you an at-a-glance reference of whether or not one of your efforts was worth it.

=COUNTIF() and =SUMIF()

The more data you have, the more challenging even simple tasks—like taking a tally or adding up the values—can be. =COUNTIF and =SUMIF simplify this process for you.

  • =COUNTIF() allows you to set conditions by which selected cells will be counted. For instance, if you wanted to count how many months you had sold widgets out of the data present in Column J of the sheet, =COUNTIF(J1:J12, “widget”) would give you that total.
  • =SUMIF() operates in a similar way, although it adds any numbers that match the conditions you’ve set, rather than just counting the instances. So, we could determine the total number of widgets sold during our established timeframe by using =SUMIF(J1:J12, “widget”, K1:K12), provided that Column K was populated with total widget sales for each month.

Excel Can Do a Lot, Lot More Than This

What are some of your go-to Excel functions? Are there any you’ve heard about that you’d like to learn how to use? Let us know in the comments, or give us a call at 810.230.9455!

110764836_embedding_video_400.jpeg

Tip of the Week: Embedding a YouTube Video into a PowerPoint Presentation

110764836_embedding_video_400.jpeg

If you’re trying to share an idea in a presentation, adding a brief video clip can make it very simple to communicate with your audience. With this in mind, it is quite helpful that Microsoft PowerPoint makes it simple to embed a YouTube video directly into your presentation, whether you’re using PowerPoint 365 or PowerPoint 2016.

Embedding a YouTube Video in PowerPoint 2016

To embed a video into your presentation:

  1. Navigate to YouTube and find the video you want to include in your presentation.
  2. Find the Share option and select Embed from the menu that appears when you click into it.
  3. You’ll see a preview of your chosen video’s thumbnail, along with a series of code and some other options that allow you to control the point from which the video starts, whether your embedded video will provide viewers with controls, and the ability to enable a privacy-enhanced mode (which pertains more to videos that are posted on a website). Copy this code in its entirety.
  4. Back in PowerPoint, click into the Insert tab and select Video. Select Online Video from the provided drop-down.
  5. A box will appear. Paste the code you copied into the From a Video Embed Code field. Alternatively, you could attempt searching for the video you wanted to use using the YouTube search field.

Embedding a YouTube Video in PowerPoint 365

The process when using PowerPoint 365 is very similar:

  1. Find the video you wish to embed on YouTube. Copy its URL from the address bar.
  2. In PowerPoint, click on the Insert tab. Select Video, then Online video…
  3. Paste the URL into the Online Video dialog box.
  4. You can also add various effects to the video preview (not the video that plays) via the buttons in the Video Format tab.

Regardless of the version you’re using, Microsoft PowerPoint has an excellent reputation amongst those who know how to use it. It, like many other solutions, provides much-needed capabilities that no business can fully go without.

Whatever your needs may be, NuTech Services can help you see to them. Give us a call at 810.230.9455 to find out more about what we have to offer.

355597506_excel_400.jpg

Tip of the Week: Keeping Track of Changes Made in Excel

355597506_excel_400.jpg

With today’s software solutions, the fact that collaboration is possible has helped many business processes move more efficiently. Despite this, there is also the potential for these solutions to contribute to confusion within your business. Take, for instance, changes people make in Microsoft Excel. Fortunately, Excel offers a means for you to track changes made.

Let’s go over how to set up this capability. As a disclaimer, it will require you to edit some of your menu options, so reach out to your IT resource to confirm that it is okay to do so and to assist you if need be.

You should also know that Track Changes won’t work if a spreadsheet contains a table that hasn’t been converted into a range. To make this conversion, select the table, navigate to the Design tab, and click the Convert to Range option. If you want others to be able to collaborate on your workbook, it needs to be saved in a shared location.

Adding the Track Changes Buttons

To access these options, you’ll need to add them to your Ribbon menu (unless your version of Excel includes them by default). Doing so is simple:

  • Right-click on the Ribbon menu. From the options available, select the Customize the Ribbon option.
  • On the resulting dialog screen, find the drop-down menu labelled Choose commands from: and select All Commands. In the other menu, select Main Tabs, and find Review in the list that appears. Click on the + next to Review, and then click the New Group button.
  • Right click on New Group, renaming it to “Track Changes.”
  • With “Track Changes” selected, find Highlight Changes and Accept/Reject Changes in the left-hand list. Click the Add button to add them to your “Track Changes” group.

Once your Highlight Changes button has been added to the Review category of the Ribbon menu, click on the Highlight Changes button. A box will appear, where you should select both Track changes while editing… and Highlight changes on screen. Click Okay once you’ve done so.

Once you’ve done this, any changes made to the spreadsheet will be marked with a small triangle in the corner of the cell to display the most recent change.

Reviewing all Changes

After everyone has contributed their input, you can choose to accept or reject the changes that have been made with the Accept/Reject Changes button. You’ll be asked to Save the Workbook, and once you have, the changes will be highlighted one by one with the option to Select Changes to Accept or Reject.

All changes will be listed so that you can Accept them or Reject them accordingly. The cursor will automatically proceed to the next change for you to repeat the process. If there are multiple instances of a similar change (like all ampersands or percentages written out instead of the symbols used), you can use the Accept All button to mass update them.

With any luck, we’ve helped make collaboration that much easier for you and your team members. For more tips like this, as well as best practices and other IT assistance, make sure you subscribe to our blog. Remember, our team is always available at 810.230.9455 for your IT needs.

117063408_computer_user_400.jpg

Tip of the Week: Using Microsoft Word Templates

117063408_computer_user_400.jpg

Microsoft Word is an excellent tool for businesses to use for a great assortment of their word processing needs… especially due to the assortment of editable templates available to users. For this week’s tip, we’ll go over how you can customize a Microsoft Word template to meet your preferences.

In actuality, you’ve used a template every time you’ve opened a Microsoft Word document… the Normal template. However, you may want to use a different template to meet your different needs. If that’s the case, you’ll need to adjust some settings as you create your document.

As you select New from the File tab, you will be presented with a few options. One of them will be Blank document, but you also have the opportunity to utilize a huge variety of other templates that can be found in the application and then downloaded. Once you have done so, select your chosen template and your new document will be generated with that template’s contents. These can include:

  • Boilerplate text
  • Styles
  • Images and logos
  • Table of contents
  • Sections that split the document into different parts, with appropriate numbering
  • Table and chart boilerplates

Of course, this isn’t a comprehensive list of your options. Feel free to explore the different templates and their options to see all that these documents can do.

Once you have a few templates downloaded, you can even edit them to better fit your needs. To do so, all you need to do is open the template you want to edit (File>Open>This PC>My Documents>Open) and make your desired changes. Once that’s done, just Save and Close.

Why Bother with Templates at All?

There are a few advantages to using templates that you should see significant benefits from, such as:

  1. Templates can be shared amongst your staff and unify your business’ style.
  2. Templates can be used to make forms much easier (and less expensive) to reproduce.
  3. Templates can reference your other applications to simplify additional tasks.
  4. Templates allow you to quickly reformat your documents if need be.

So, do you think you’ll do any investigating into templates in the future? Why or why not? Let us know in the comments, and let us know what other tips you would find helpful!

279676523_Office_400.jpg

Microsoft is Constantly Improving Office 365

279676523_Office_400.jpg

Microsoft Office is the most common productivity suite in the world, and it’s for a good reason. One of the biggest reasons for this is that they routinely update the applications with great features. Office 2019 is one of the biggest improvements that Microsoft has made, and it features several apps that make the modern office work.

The following apps are included in Office 2019:

  • Outlook
  • Word
  • Excel
  • PowerPoint

Here are some changes that have been brought to these applications.

Outlook

Most people use Outlook for email, but it’s more of a personal information manager, since it can be used as a calendar, task manager, and contact manager. Changes to Outlook 2019 include:

  • One-click fixes for accessibility issues – Enhanced accessibility options are updated to new international standards.
  • Focused inbox – Outlook now features more options to keep you focused on the information you need and less on the glut of email that you may get. 
  • Outlook reads your emails to you – Outlook now offers a text to voice option that will read your emails to you. 

Word

Microsoft Word is the Office suite’s word processor, and Word 2019 is looking to be a great upgrade from Word 2016. Here are some of the best changes:

  • Real time collaboration – Work side-by-side with others to collaborate on documents in real time.  
  • Integrated translation – Microsoft translator gives workers the ability to translate words, phrases, and sentences in many languages.
  • Enhanced reading options – Instead of straining your eyes, choose options to help make it easier on them, including page color, column width, text spacing, or have Word read your document to you.
  • Easier navigation – You can now flip through documents quickly with side-by-side view.

Excel

Excel is a spreadsheet software that comes bundled with Microsoft Office. The latest version gives users plenty of opportunities to take advantage of new and interesting features, several of which give Excel the ability to act as a database. Here are just a few of the new features:

  • New Charts – Users can now create a series of new charts, including map charts, funnel charts, and more. 
  • Precision selecting – Now users can deselect cells that aren’t relevant to their query without having to frustratingly start over.  
  • New and improved connectors – Now there are integrations that allow Excel to be front and center on any of your organization’s analytics initiatives.

PowerPoint

PowerPoint is Microsoft’s presentation-creator app. The software has hundreds of other functions, of course, and PowerPoint 2019 expands PowerPoint’s effectiveness in the long run. Some functions include:

  • Zoom for PowerPoint – Provides custom navigation inside a presentation for more presenter-friendly interaction.
  • SVG image compatibility – You can now insert and edit scalable vector graphics (SVG) images for clearer, more defined imagery. 
  • Export to 4K – Now you can export your presentation to 4K format, slightly better than Ultra High Definition. 

Other software

Office 2019 is also built with a much-improved Microsoft Teams collaboration app–and SharePoint–the industry standard in project management and coordination. Additionally, the ever-popular Microsoft Office 365 now uses Office 2019 as a base for their cloud-delivered products. 

Microsoft lists OneNote as a part of their Microsoft Office platform, but the software giant is starting to move away from OneNote as a part of the productivity suite, building it instead as a part of Windows 10. 

If you would like to talk about what Microsoft products are right for your business and/or personal computing needs, the IT professionals at NuTech Services are available to answer your questions and give you suggestions. To speak to one of our certified consultants call us today at 810.230.9455.

excel_features_power_400.jpg

Tip of the Week: Excel Features for the Power User

excel_features_power_400.jpg

As useful as a spreadsheet can be to convey information, they can be a little drab and disengaging if the full capabilities of Microsoft Excel aren’t understood and leveraged. For today’s tip, we’ll go over a few little-known and underutilized features that can help you create spreadsheets with both more style, and more utility.

Visible Zeros
There is a fair chance that, at some point, you will need to input data into Excel that begins with zeroes, whether you’re documenting serial numbers or what have you. The trouble is, Excel has a habit of hiding these zeros, so 0056907 would display as 56907. This unfortunately renders the data inaccurate. However, an easy fix to this is to just add a quotation mark in front of the number. This prevents the zeros from being omitted, so instead of resulting in 56907, you would keep your original “0056907.

Adding a Drop-Down List
Adding a drop-down list to a spreadsheet is a simple, yet effective way to limit the input a particular cell will accept. The first thing you have to do is select the cell that needs to have drop-down capabilities, and then click Validate in the Data tab in the header menu. On the Settings page of the window that pops up, there will be a menu labelled Allow. From that menu, select List and highlight the cells that make up the options you want in your drop-down, and finally, click OK.

Accessing Tools on the Developer Tab
Depending on your needs, you may require some more advanced capabilities in your spreadsheet, like creating option buttons, creating macros, and other features. These can all be found in the Developer tab, which is hidden by default. In order to access it, you will first have to access the Excel menu at the top of your screen and select Preferences. Once you’re provided with the Preferences menu, select Ribbon & Toolbar. You will then see a list of the various options that you can add or remove from your Tabs. Selecting Developer will give you access to the tools that tab contains.

Shading Every Other Row
If spreadsheets have any faults, the eye can easily wander when one is looking at them. Adding shading to the formatting, more specifically, to break up individual rows can be very helpful to someone trying to read the information the spreadsheet has to share. To do this, you will need to highlight the area where you want to display the effect or use the Select All shortcut (Ctrl + A) to apply the effect to the entire sheet. In the Home tab, click into Conditional Formatting and select New Rule from the drop-down menu. You will then have a Style drop-down menu to select from, from which you should pick Classic, after which you should select Use a formula to determine which cells to format. Enter the formula =MOD(ROW(),2) and pick your desired color, and your spreadsheet should be striped quite nicely.

Do you know any other tricks to improve the use of Microsoft Excel? Share them in the comments!

Wordlogo400.jpg

Tip of the Week: 3 Useful Microsoft Word Features

Wordlogo400.jpg

Microsoft Office’s Word is undoubtedly one of the most popular word processing software in the world, perhaps even the most popular. Still, there are many people who use Word on a regular basis without putting the majority of its features to use. Here’s three more Word capabilities that you’ll find very handy.

Change the Case of your Text
HAVE YOU EVER ACCIDENTALLY WRITTEN SOMETHING ENTIRELY IN CAPS? It happens to everyone. However, many people don’t realize that you don’t have to delete everything and rewrite it. Microsoft Word has a handy feature that allows users to change the case of your text. You can choose from: Sentence case. Lowercase. UPPERCASE. Capitalize Each Word. and tOGGLE cASE.

word ib 1

Auto-Update Date & Time
Even though the majority of business correspondences are done digitally, there are still some times when you need to write a good ol’ fashioned direct mail letter. For example, many businesses like to send a welcome message/onboarding letter to new clients. These letters will probably be uniform, with some personalization for each client. Word offers some assistance in making sure the information is updated in the letter. One very handy one when working with templates is the auto-update Date & Time feature.

Under the Insert tab, click the Date & Time button and a pop-up window will appear. Click the date format you want and then be sure to click the “update automatically” box in the bottom right corner. Now the date will automatically be updated every time you open (or print) the document.

word ib 2

Get Rid of Unwanted Formatting
Most people who use Microsoft Word on a regular basis have had to deal with accidentally pasting text that held the formatting of the document you copied it from. This contagious font will even take over the rest of the document, following the formatting of what was pasted rather than your desired format.

Word has a command that you can use to Clear All Formatting. It can be found in the menu and its icon looks like the letter ‘A’ with a pink eraser. You can also use the keyboard shortcut: Ctrl+Space

word ib 3

For more great information about the software you use every day, visit our blog regularly.

office_vs_office_365_400.jpg

What’s the Main Difference Between Office 365 and the Traditional Office Suite?

office_vs_office_365_400.jpg

Even if you already have Microsoft Office, did you know that there are multiple ways to use Office which could potentially save you money? It’s the difference between using the traditional Office apps, versus the subscription-based model provided by Office 365.

Users and business professionals need to know that Office 365 is a subscription-based model, while the traditional Office 2016 suite is a one-time purchase. Yet, there are a few other notable differences between the two. Here are three reasons why it’s beneficial to choose Office 365 over the more traditional Office suite.

Office 365 is Cost-Effective
Small monthly payments fit into budgets much better than big up-front costs. This is a staple of software as a service, and it applies to Office 365. When purchased through Microsoft, Office 365 can provide users with a discount when paying for 12 months ahead of time, allowing for even more cost savings.

Office 365 Stays Up-to-Date
The traditional Office suite gives you the most recent version at the time of your download. For example, if you downloaded today, you would get Microsoft Office 2016. The problem here is that several years might pass and you’ll eventually have to upgrade to a more recent version of the software, like Office 2018–which can be another major expense in itself. It’s one big investment after another, which makes the subscription-based model more economically reliable, efficient, and easy to budget around. With Office 365, you’ll always have the latest version of Microsoft Office, without the hassle of purchasing new software.

Office 365 is More Flexible
Office 2016 is a one-time download, unlike its subscription-based counterpart. Office 365 allows organizations to achieve varied levels of service as per their user requirements or device thresholds. This helps your business get exactly the kind of functionality you need out of Office 365, as it helps to better accommodate growth.

Have we convinced you to give Office 365 a shot? If so, reach out to us at 810.230.9455. We’d be happy to help your business get started with your new Office 365 solution.

b2ap3_thumbnail_sharepoint_information_400.jpg

SharePoint Brings Dynamic Collaboration to Your Business

b2ap3_thumbnail_sharepoint_information_400.jpgEvery business needs a platform they can use to securely store, organize, share, and access the mission-critical information needed to keep operations running smoothly. SharePoint is Microsoft’s intranet solution for enterprises of all shapes and sizes, and it’s worth looking into for your data needs.

SharePoint is part of the Microsoft Office 365 family, which means that it works seamlessly with all of Microsoft’s productivity applications. Yet, SharePoint isn’t a Microsoft-exclusive product. For example, it easily integrates with popular enterprise software from third parties. The integration of a valuable tool like Yammer, a corporate-style social network, is a great example of this.

Additionally, SharePoint can be accessed by non-Microsoft web browsers like Chrome and Firefox (and of course, it works great with IE and Edge). In fact, this is probably SharePoint’s strongest selling point; the fact that it can be accessed from the web browser of virtually any Internet-connected device. This is possible thanks to SharePoint’s ability to be hosted on the cloud, or on-premises (in your own IT infrastructure).

Another advantage of SharePoint comes from its versatility. As explained by the Microsoft support page, here are four ways that SharePoint can benefit your business.

  • SharePoint Online. A cloud-based service, hosted by Microsoft, for small and large businesses. Instead of installing and deploying SharePoint Server on-premises, organizations can subscribe to an Office 365 plan, or to just the SharePoint Online service. Using SharePoint Online, your employees can create intranet sites for the purpose of sharing documents and files with colleagues and customers.
  • SharePoint Foundation. SharePoint Foundation is available for on-premises deployment. You can use SharePoint Foundation to create a variety of sites that let your team collaborate on documents, lists, calendars, and other mission-critical data.
  • SharePoint Server. Organizations have the option to deploy and manage SharePoint Server on-premises. SharePoint Server also offers additional features and capabilities like Enterprise Content Management, business intelligence, enterprise search, personal sites, and a news feed.
  • OneDrive for Business folder sync. A desktop program that allows you to sync offline versions of your files to a folder on your computer.

The primary benefit of SharePoint is that it allows everyone on your team to share corporate data with each other. SharePoint is essentially the ultimate team collaboration tool for enterprises. Here are just some of the ways it can benefit your operations:

  • Share documents and files with employees and partners.
  • Host internal training guides.
  • Manage and organize projects.
  • Keep commonly updated documents in order.
  • Build and maintain repeatable processes.
  • Use it as a single, central location for everything going on internally.

Do you think that SharePoint is the intranet solution that your company needs? Whatever data-sharing platform you go with will affect operations in a major way. Therefore, you’re going to want to make sure that you consult an IT expert before making such an important decision regarding your company’s mission-critical technology. Give NuTech Services a call at 810.230.9455 to have a discussion about your data-hosting options, and to find out if a solution like SharePoint is right for you!

b2ap3_thumbnail_microsoft_office_400.jpg

Microsoft Office 2016 is Here and It’s Got Something For Everyone

b2ap3_thumbnail_microsoft_office_400.jpgIt’s only been a few months since Microsoft introduced Windows 10, but the world’s largest software company is now updating their wildly popular Office productivity suite. Office 2016 takes the fully-featured productivity apps that users are used to and adds in significant improvements, especially to the integrated collaborative capabilities. Applications like Word, Excel, PowerPoint, Outlook and the other apps that make up the Office suite have all seen improvements.

Microsoft Word
Microsoft Word is one of the most utilized word processing programs on the market, and has been for over three decades. Word 2016 has built-in dynamic features that help users collaborate, share, and remain productive, in real time. With integrated features that allow users to edit any kind of text file, including classically-stubborn PDFs. Improvements to Read Mode allow for a reconfiguration of text to provide an easier-to-read interface, while the “Tell me what you want to do…” bar is a great addition for users that want to utilize the software to its maximum benefit. Whether you use a centralized SharePoint interface or simply store your files using OneDrive or a local repository, Microsoft Word will continue to be the go-to program for all of your word processing needs.

Microsoft Excel
Excel is the most useful spreadsheet application on the market with dozens of features that no other major spreadsheet application offers. Like Word, the Excel program has been improved to include dynamic collaborative options, while maintaining the trusted and powerful interface millions of users already know. Some of the more useful new options that Excel 2016 delivers include more access to charts and graphs than ever before, as well as improved pattern recognition. Like the other apps in the suite, Excel adds the “Tell me what you want to do…” box, to help users completely utilize the app’s features.

Microsoft PowerPoint
For anyone that needs to produce the perfect presentation, Microsoft PowerPoint is on the short list of applications dedicated to that purpose. PowerPoint 2016 provides users with a higher degree of access than ever before, allowing users to team up to edit, manage, and create presentations in real time. The new PowerPoint offers improved revision history and better conflict resolution, keeping users on task and efficient.

Microsoft Outlook
Outlook is one of the most utilized email interfaces in the world, and Outlook 2016 makes certain that won’t change in the future. Again the major theme of Office 2016 is collaboration, and Outlook makes it easier than ever to send and receive files and keep messages organized. Outlook, has also integrated the “Tell me what you want to do…” box, giving users a robust interface to assist them with whatever issues arise.

Other improved applications that are a part of the Microsoft Office 2016 suite are:

  • Microsoft OneNote – Office’s note-taking application
  • Microsoft Access – Office’s database management software
  • Microsoft Project – Office’s project management software
  • Microsoft Visio – Office’s diagramming software

Each will get the “Tell me what you want to do…” box integration as well as subtle improvements over their previous versions.

If you are looking for a comprehensive productivity suite, look no further than Microsoft Office 2016 through Microsoft’s Office 365 offering. With Office 365, users get all of these powerful apps complete with OneDrive integration for a simple and affordable monthly rate. Call NuTech Services at 810.230.9455 to get an idea of further benefits Microsoft Office 2016 and Office 365 can offer your organization.

b2ap3_thumbnail_excel_sheets_400.jpg

Tip of the Week: Freeze an Excel Row for Easier Spreadsheet Navigation

b2ap3_thumbnail_excel_sheets_400.jpgMany office workers feel like they live in Microsoft Excel, spending hours using spreadsheets to enter data and crunch numbers. By taking advantage of tools like Excel’s freeze feature, workers can make the most of their time by navigating a spreadsheet more efficiently.

Once a spreadsheet grows to be larger than the screen, it can become tricky to navigate. It can be maddening to try and cross-reference a certain row or column on one side of the spreadsheet with another that’s offscreen.

Excel’s freeze feature resolves this pain point by freezing a selected row or column into place, allowing you to scroll off screen while having your needed row or column locked into place. When you think about it, this Excel feature is kind of like a grown-up version of freeze tag.

To freeze a row or column in Excel, select the cell that’s in the first column and row that you don’t want to be frozen. Next, go to the View tab and click Freeze Panes. A drop down menu will appear. From here, click on the first option, Freeze Panes.

lock panes one

With your selected rows now frozen in place, you will be able to scroll up, down, and sideways in your spreadsheet without having your needed columns or rows move off screen. When you’re ready to unfreeze your rows and columns, simply select any row or column and then go to the View tab. Now go to Freeze Panes > Unfreeze Panes.

lock-panes-two

This is just one of the many Microsoft Office features that make navigating a project easier. Be sure to check back next week for more time-saving technology tips.

b2ap3_thumbnail_presentation_power_400.jpg

Tip of the Week: 5 Ways to Put the Power Back In Your PowerPoint Presentations

b2ap3_thumbnail_presentation_power_400.jpgPresentations are a necessary, albeit time-consuming, responsibility that you have as a business owner. Thankfully, there are simple tools like Microsoft PowerPoint available to help make your job a little easier. Unfortunately, it’s very easy to make a boring or less-than-great presentation, which can hamper the audience’s ability to let the message sink in. Here are five ways to make sure that your next PowerPoint is as effective as possible.

pp tips 1.jpg

Minimal Text Means a More Effective Message
When making a presentation, some users will find that it’s very easy to load their PowerPoint presentations full of text. This is one of the most common ways that PowerPoint presentations fall short when it comes to value. The slideshow text shouldn’t be used as a substitution for your own voice. It’s difficult for an audience to read the text on a slideshow and listen to you speak at the same time, so use a minimal amount of text whenever possible; and whatever you do, do not read directly from the slides.

spock giving directions

Use Quality, High Definition Graphics
During the construction phase of your presentation, it’s important that you keep the quality of images in mind. Just because the presentation looks great on your monitor doesn’t mean that it will look fine when blown-up on a big screen. Low or normal quality graphics might look blurry when applied to a large screen, so it’s important to always use high quality graphics whenever you can. Try to avoid using generic Microsoft Office clip art graphics and stock photos, if possible.

Don’t Use Animated Transitions
It’s true that the occasional slide transition can help ease the monotony of simply clicking the button and advancing to the next slide, but animating every single image and bullet point is a little overkill. You want the audience to be able to concentrate on you and your presentation. If they’re too busy staring at words whipping all over the screen, you run the risk of losing their attention, which is counterproductive to your goals and intentions.

Use a Single Clear and Consistent Font
pp tips 3
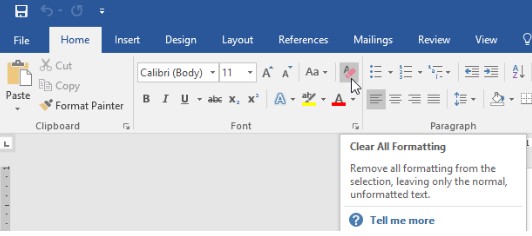
othing is more unprofessional than a PowerPoint presentation that can’t seem to decide which font it likes the most. If your slideshows use multiple different fonts, you’ve likely fallen victim to this common mistake. Use one font and make sure every slide uses only that one. Your slideshow should utilize a basic font like Arial that can be seen uniformly across the entire presentation area. Fancy letters aren’t necessarily good for your presentation, either, so avoid those as often as possible.

Use a Uniform Color Scheme
Inconsistent colors can be one of the worst ways to destroy a presentation. Just because your presentation can have all of the colors of the rainbow doesn’t mean that it needs to. The less complex your color scheme is, the better for your viewers. Try using your company’s logo as a jump-off point, and be sure to use the templates provided by Microsoft Office. Unlike the clip art, the templates are actually very sharp and simple to use.

All of this winds down to one overarching tip that should always be followed when constructing the PowerPoint slideshow. You should always design it with the end user in mind. The audience is the one who has to view it, so make it easy on the eyes and use it to augment your presentation in a professional manner. After all, you’re the one they want to see, not the PowerPoint.

Do you have any particularly helpful tips you’d like to share concerning PowerPoint? Let us know in the comments, and be sure to call NuTech Services at 810.230.9455 for more tips on how to make the most out of MS Office.