totw_display_settings_400.jpg

Tip of the Week: Change Display Settings in Windows 10

totw_display_settings_400.jpg

One of the easiest ways you can customize your Windows 10 experience is by changing your device’s display settings. There are plenty of settings to change as per your specific needs, so this week’s tip will be dedicated to getting the most out of your displays, whether it’s a large new monitor you got over the holidays or an old one that has a little more life in it.

There are lots of options for changing your display settings. To access these settings, click on the Start menu and select the gear icon for Settings. The first option on the Settings screen is System, where the first option is Display, so you’ll have no problem checking it out. Here are some of the options:

Change Your Screen’s Brightness
With this option, you can change–get this–your screen’s brightness! This is critical if you want your device’s battery to stay under control. There is a slider that you can use to adjust the screen’s brightness. Underneath this, you’ll see another option to turn on the Night Light. This makes the device’s screen turn to warmer colors to make it easier on the eyes at night. You can even schedule the night light to turn on at a specific time.

Scale and Layout
Under this option, you can change the default size of text and applications, among other things. There are several dropdowns under this heading that give you dynamic control over several aspects of your display, including the display’s resolution and the screen orientation.
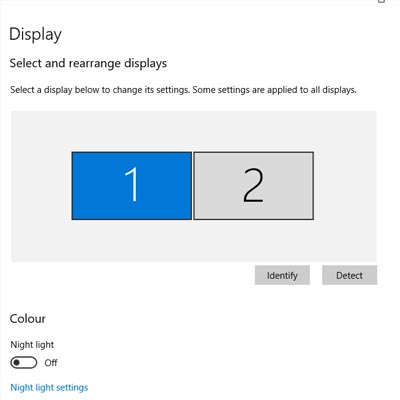
Multiple Displays
One of the best ways you can get the most out of your monitors is by using more of them. If you have multiple monitors connected to your device, your settings will give you options for what to do with them. You can connect to them wirelessly, detect connected devices, and so much more. Just click on the links in your settings to learn more about what you can do, or reach out to us to learn more about what the settings mean.

Before you change any settings for your devices, if you have any questions about what they mean or why, consult professionals at NuTech Services who know what they are doing. It’s better than making a change and not knowing how to change it back.

Overall, changing up your display can be great for both your device’s battery and your productivity. For more great tips and tricks about how you can get the most out of your monitors and displays, reach out to us at 810.230.9455.

totw_set_system_apps_400.jpg

Tip of the Week: Set Your System up with the Apps You like to Use

totw_set_system_apps_400.jpg

Sometimes you’ll open up a document and it will open up in a default program on your computer that you never use, or one that you might not even know you have. This can happen with common types of file formats, like PDFs or MP3s, that could be opened by more than one program on your computer. Windows 10 makes it easy to customize your user experience through changing up the default applications for specific file types. We’ll show you how it’s done.

To change your default applications for Windows 10, just follow these steps:

  • Click on the Start menu in the bottom-left corner of the screen.
  • Click on Settings. It’s the option with a gear-like icon next to it.
  • Select the System option.
  • Click on Default apps next.

You’ll see your options for selecting an app in the form of categories. These categories are Email, Maps, Music Player, Video Player, Photo Viewer, and Web Browser. Once you’ve selected a category, you can choose a default app that will open anything related to that category.

An easier way to do this is by right-clicking the file you want to open. You then need to select Open with. Choose the app that you’d like to use to open the file, or you can select Choose another app if you don’t see the one you want. You can either select it for this one instance or you can have Windows remember your choice for the future.

If you need to reset your default apps, it’s as easy as can be. Just follow the steps below… just in case you set a default app you don’t like.

  • Click on the Start menu.
  • Select Settings.
  • Navigate to System.
  • Click Default apps.
  • Click the Reset button at the bottom.

Once you’ve finished, your Windows 10 device will reset to its default applications. It’s really that easy.

Don’t fall behind the times with your tech knowledge. To keep learning more about your favorite business solutions, subscribe to our blog.

block_phone_numbers_on_mobile_400.jpg

Tip of the Week: Follow These Steps to Prevent Telemarketers From Calling You

block_phone_numbers_on_mobile_400.jpg

Here’s a common scenario: you’re relaxing at home with friends or family and all of a sudden, your cell phone starts ringing. You don’t recognize the number; in fact, your phone lists it as an out-of-state caller, so you don’t pick up. The call eventually ends and you’re back to relaxing. But then, your phone starts ringing again and it’s that same pesky solicitor trying to sell you on the virtues of auto loan refinancing or a free Caribbean vacation. Caller ID and voicemail have helped to curb the suffering over unwanted phone calls in the past, but what if you could just block a caller entirely?

Regardless of the phone you have, for this week’s tip, we can show you how to block telemarketers, scammers, and stalkers from ever contacting you again. Telemarketing is completely legal, so it won’t be going away anytime soon. Blocking callers is the quickest and easiest way to deal with this issue. If they call you once, you won’t ever have to deal with them again, after you’ve followed these steps:

Android Users
For Nougat and Marshmallow:

  • Go to the Phone app.
  • Navigate to All Calls.
  • Select Call from Undesired Contact.
  • Tap Block/Report Spam.
  • Then you will be asked if you would like to report the call as spam. Check the box, if you do wish to report it.

For Lollipop (Samsung Galaxy S4, S5, S6, Note 4 users):

  • Go to the Phone app and tap the Call Log.
  • Select the phone number you would like to block, then tap More.
  • Next, tap Add to Auto reject list and you’re all set!

iPhone Users
To block a number on your iPhone, first select the Phone app. Next:

  • Select Recents (at the bottom of the screen).
  • Find the number of the caller you wish to block and tap the i icon on the right-hand-side of the screen.
  • Here you will see the caller’s information, as well as different options for creating a new contact, etc. Scroll to the very bottom of this page and you’ll see the words, ‘Block This Caller.’
  • Once you’ve selected that, a message will pop up, asking you to confirm this decision. Tap Block Contact to make it official.

If you’re receiving unwanted text messages from a stranger, iOS 10 requires that you add this person or bot to your Contacts list first. To create a new contact from your Messages app, click on the phone number at the top of the screen and select Create New Contact. Then simply follow the steps listed above. If you haven’t upgraded to iOS 10 yet, look for the i icon in the upper-right corner of your text conversation and select it. Then tap Block This Caller > Block Contact.

There, now you’re ready to block like some of the best centers in NBA history. But also remember that, with great power comes great responsibility; while telemarketers won’t know if they’re on your block list, “friends” and family members you find annoying might eventually catch on. For more technology tips and tricks, reach out to NuTech Services at 810.230.9455.

b2ap3_thumbnail_hold_up_in_gmail_400.jpg

How to Block and Unsubscribe from Users with Gmail’s New Features

b2ap3_thumbnail_hold_up_in_gmail_400.jpgWe all know how annoying spam and unwanted emails can be when you’re trying to navigate your inbox. While a quality spam filter can go a long way toward eliminating these irritating time-wasters, Gmail now has a feature that lets you dodge some of this pain. With the ability to block selected users and unsubscribe from email campaigns, you can reclaim plenty of time that you might have been wasting weeding out your inbox.

Before we dig into the details, though, it should be mentioned that, while Gmail’s new feature is indeed a good first step towards eliminating spam in your inbox, it’s by no means a guarantee that you’ll see a significantly less amount of time-wasting messages. A comprehensive spam-blocking solution is often necessary to keep malicious emails and other time-wasting junk out of your inbox. Just because you block or unsubscribe from a particular email address doesn’t mean that emails won’t start pouring in from another source. If you have concerns over your current levels of spam and junk mail, feel free to contact NuTech Services at 810.230.9455.

Still, Gmail is taking strides to make it easier for the average consumer to take advantage of the benefits of email, without the negative side-effects, like spam. If you happen to be receiving an alarming number of messages from a specific person that you don’t want to hear from, or if something just looks plain sketchy, you can block anything further from the sender. Any blocked messages will immediately be sent straight to your spam folder. To block someone, all you have to do is open an email from the sender you want to block, click on the down-arrow next to the reply button, and select Block “user.”

Gmail’s unsubscribe feature works in a similar manner to the unsubscribe links that you might find in various advertisement emails, like ones you might get from Amazon or other big-box retailers. On the Android Gmail app (the most recent version – this feature isn’t on the desktop version of Gmail yet), open a message from the user you want to unsubscribe from. Click the three-dot More button next to Reply and select Unsubscribe.

While this doesn’t necessarily block spam completely, it’s a good step in the right direction. Your goal shouldn’t be to send all spam to the spam folder; in order to achieve maximum productivity and email security, you want to prevent spam altogether. For more tips on how to accomplish this feat, give NuTech Services a call at 810.230.9455. Also, be sure to subscribe to our blog, where we often post about the latest security developments, security how-tos, and much more. When it comes to securing your email from spam, and protecting your business from hackers, you need all of the help you can get.